Leaderboard


Popular Content
Showing content with the highest reputation on 02/28/2021 in all areas
-
@Wavebuster as requested, I watched all of your videos and will provide some feedback. I don't have much to say since your runs are overall good and well executed. Seabed Upper Levels (Pattern 1-1) 0:10 Door position is better, after you stepped on the middle 0:35 With TypeSH/Shot or Yasminkov 7000V you can get both Dolmolms at the same time from the ramp corner, before Sinow Zoa drops 0:54 Get directly behind the recoboxes when you enter this bridge and target all of them from here 1:59 Target just the 3 South recoboxes at once, since the East ones are optional. 2:17 <<Two blue Sinows will spawn when the purple quids die. If the blue squid is still alive due to hell RNG it can be problematic.>> This is wrong. Dolmdarls and Dolmolm here belong to the same wave so it doesnt matter who you kill first. 2:40 Ignore Recoboxes at first, just rush to Center North of the room to trigger Deldepths 4:20 South East corner for first spawn, door position for second spawn Seabed Upper Levels (Pattern 1-2) 0:17 You have enough time to combo kill first Sinow without freezing before the second sinow attacks 0:39 Can directly go to the door before shooting at Dolmdarls spawn 2:13 Use any trap at middle so you can target all 4 ceiling Recoboxes at the same time 5:36 Once you reached ramp bottom, you can immediately come back and get all Dolms from the north Seabed Upper Levels (Pattern 2-1) 0:36 Free confuse traps are sometimes useful against Dolms that you are willing to hell, so that they would target each other in the case your hell attacks all miss 0:45 Not worth it to disable poison unless you are DFing (you are saving only one Trimate with this) 1:22 No need to freeze dropping Sinow Zoas when you can combo kill them before they move 2:24 Step forward and get the two Dolmdarls in one combo with a Yasminkov 7000V 3:23 Can get closer to the door for that Delbiter (its spawn location is middle of easter room half) 4:27 Can also ignore Recoboxes, get the two Sinow Zoa to jump to the middle, dodge, freeze and kill them at once. Little more risky and requires a good timing but saving many seconds. 5:03 Use traps (or aim Recon when there is one) to center lock TypeSH/Shot and target recoboxes two by two 5:15 Use Macho Blade to refresh SD 5:57 Kill just one Recobox, then Power Maser for the 4 traps Seabed Upper Levels (Pattern 2-2) 2:27 Get closer to the door (corner side) to kill Delbiter right before exit 3:50 Priority on north and south Recoboxes since other 2 don't spawn Recons 5:02 Can stand at West, closer to door and don't need Twin Blaze to freeze Delbiter from here 5:56 Typically one of Power Maser's best moments. One attack would have been enough. Seabed Lower Levels (Pattern 1-1) 3:45 Morfos trick. No need to freeze them 5:07 Delbiter doesn't need twin blaze, stand at center of eastern corridor half, it's the limit to spawn the delbiter, use FS directly and kill 6:50 You are using 2 FT, 2 FS combo, 2 PR combo and 1 S-Beat combo for this spawn while you can get all 3 with just DM and 1 FT. Rush to the lower door, dodge and get behind the right Sinow Zoa, drop a FT and by the time you do that, Sinow Zele will jump/teleport with the two others so you can freeze and kill all 3 at the same time. Seabed Lower Levels (Pattern 1-2) 0:24 Can get the two Morfos with TypeSH/Shot 1:27 Ignore that Morfos, should not even have time to shoot you by the time it gets out of your vision 4:59 Power Maser Seabed Lower Levels (Pattern 2-1) 2:30 Don't kill Recobox first, run straight forward and get Zoas 5:03 Go to door spot at Sinows jump 5:35 After ramp, can get to upper plateform center and get all 4 enemies at once from here 6:01 Can dodge his jump at center of corridor 6:10 If you turn left at this point, you make Dolmolms spawn earlier Seabed Lower Levels (Pattern 2-2) 0:10 Better stay middle 4:15 Alternatively, you can hide behind the pillar (where Sinow Zoa can't reach you) and wait for Sinow Zele, killing one Recobox in the meantime to clear the path. 5:43 Yasminkov 7000V's autolock would have helped, in addition to its higher ATA So I know you did not have Power Maser or its required components yet when you did those runs, but here's a reminder of all of Power Maser qualities against traps: - hits trap above your head, no matter its heigh (so you can get closer to get more traps in big rooms) - hits behind walls - can target traps in other rooms - better range than Shots - can't miss (when your bullets don't hit a trap because of its wobbling) - 10 targets limit - instant swipe (no bullets animation delay, useful in teams) - easy "center targetting" without autolocking a nearby target2 points
-
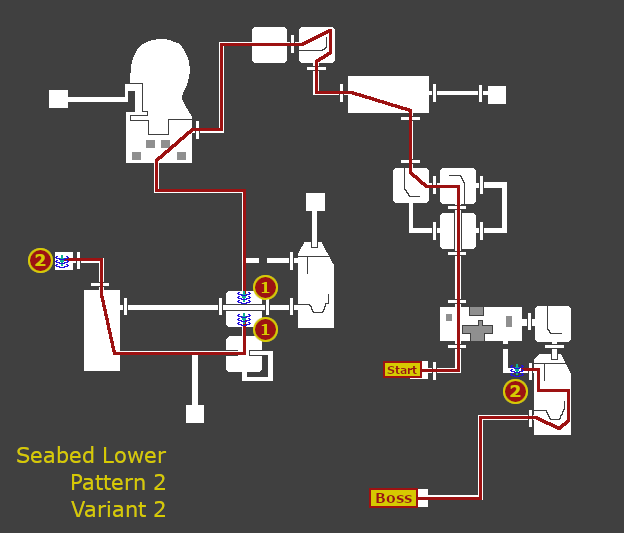
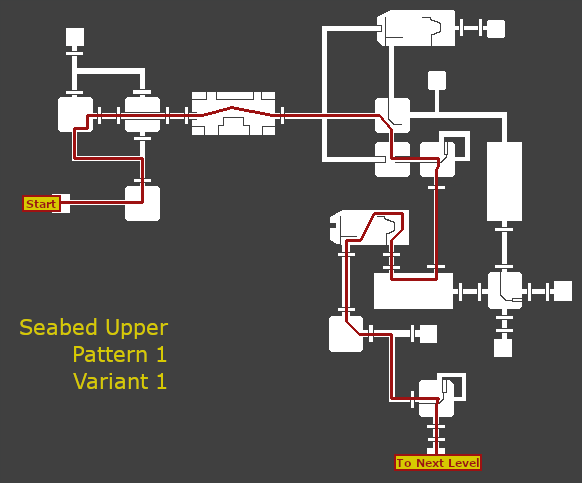
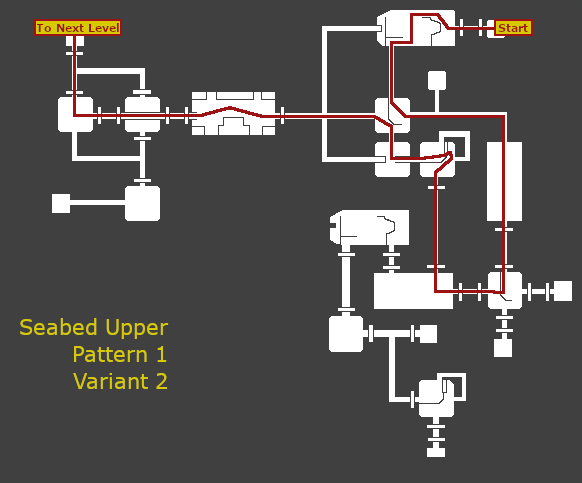
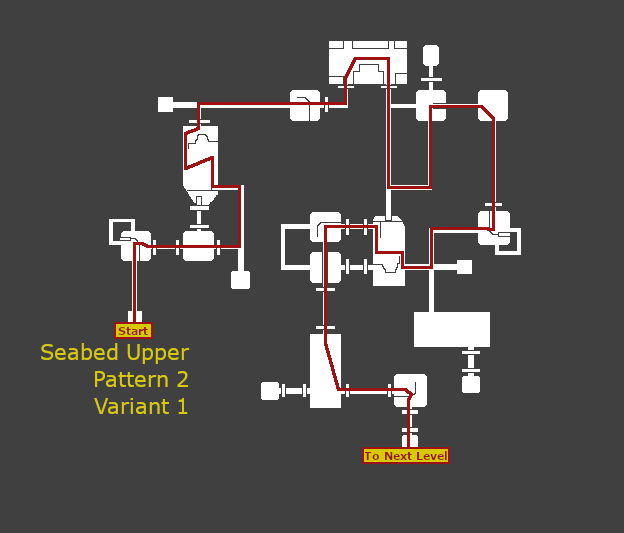
Hey everyone, @Wavebuster and I have collaborated to build content that will help you do your own seabed runs so YOU TOO can get 7 8 PGFs! Below you will find cleaned up, easy to follow, no-nonsense versions of the 8 variations of the Seabed maps. Wave was nice enough to put together videos of all 8 variation runs to show you strategies on how to deal with enemies, as well as get through certain obstacles such as crates and ledges. P.S. For the crate trick to work with females RAmarl and HUcaseal, you will need a Photon Claw-like weapon. For other females, you'll need to use a weapon with sword animation (example: Crazy Tune) but it requires very precise positioning. For males, you will need a Katana-type weapon. For the video, Wave uses Yamigarasu but Toy Hammer will also work (and are plentiful during this event). Crate/Ledge Trick for RAmarl/HUcaseal Without further ado, here is the content: Seabed Upper Levels - Pattern 1, Variant 1 Seabed Upper Levels - Pattern 1, Variant 2 Seabed Upper Levels - Pattern 2, Variant 1 Seabed Upper Levels - Pattern 2, Variant 2 Seabed Lower Levels - Pattern 1, Variant 1 Seabed Lower Levels - Pattern 1, Variant 2 Seabed Lower Levels - Pattern 2, Variant 1 Seabed Lower Levels - Pattern 2, Variant 2
 1 point
 -
@R-78 congrats! Sorry for all you sleepers out there 🤣1 point
-
sorry, try max u desert.1 point
-
My bands new single is out https://ampl.ink/4oBlo1 point
-
List has been updated Difficulty Episode Section ID Monster Item Ultimate 4 Oran Pazuzu **NON EVENT DROP** Ultimate 4 Oran Dorphon Éclair **NON EVENT DROP** Ultimate 4 Purplenum Dorphon Éclair **NON EVENT DROP** Ultimate 4 Purplenum Pazuzu **NON EVENT DROP** Ultimate 4 Purplenum Dorphon Éclair **NON EVENT DROP** Ultimate 1 Skyly Gran Sorcerer **NON EVENT DROP** Ultimate 1 Yellowboze Arlan **NON EVENT DROP** Ultimate 1 Bluefull Merlan Amore Rose Ultimate 1 Greenill Merlan Amore Rose Ultimate 1 Greenill Bartle Amore Rose Ultimate 2 Greenill Gulgus Amore Rose Ultimate 1 Oran Merlan Amore Rose Very Hard 1 Oran Booma Amore Rose Ultimate 1 Purplenum Ob Lily Amore Rose Ultimate 4 Purplenum Ba Boota Amore Rose Ultimate 1 Purplenum Merlan Amore Rose Ultimate 1 Redria Merlan Amore Rose Ultimate 1 Skyly Merlan Amore Rose Ultimate 1 Whitill Bartle Amore Rose Ultimate 1 Whitill Merlan Amore Rose Ultimate 1 Yellowboze Merlan Amore Rose Ultimate 1 Yellowboze Ob Lily Amore Rose Ultimate 2 Bluefull Sinow Berill Angel Harp Ultimate 4 Pinkal Merissa A Angel Harp Ultimate 4 Redria Merissa A Angel Harp Ultimate 1 Viridia Melqueek Angel Harp Ultimate 2 Whitill Gulgus Angel Harp Ultimate 1 Greenill Melqueek Bamboo Spear Ultimate 4 Redria Girtabulu Blue Black Stone Ultimate 1 Viridia Gran Sorcerer Blue Black Stone Ultimate 1 Yellowboze Gran Sorcerer Blue Black Stone Ultimate 4 Purplenum Yowie Butterfly Net Ultimate 1 Redria Delsaber Dress Plate Ultimate 1 Oran Delsaber Genpei Ultimate 1 Purplenum Gran Sorcerer Glide Divine V.00 Ultimate 1 Whitill Gran Sorcerer Glide Divine V.00 Ultimate 4 Oran Ba Boota Great Bouquet Ultimate 2 Purplenum Merilia Great Bouquet Ultimate 1 Redria Ob Lily Great Bouquet Ultimate 1 Skyly Ob Lily Great Bouquet Ultimate 1 Yellowboze Ob Lily Great Bouquet Ultimate 4 Oran Del Rappy Heavenly/TP Ultimate 1 Oran Gran Sorcerer Heavenly/TP Ultimate 1 Bluefull Melqueek Kroe's Sweater Ultimate 1 Purplenum Delsaber Last Swan Ultimate 1 Whitill Delsaber Last Swan Ultimate 1 Yellowboze Delsaber Last Swan Ultimate 1 Redria Dark Bringer Lindcray Ultimate 4 Whitill Girtabulu Lindcray Ultimate 1 Greenill Ob Lily LOGiN Ultimate 4 Oran Yowie LOGiN Ultimate 1 Whitill Ob Lily LOGiN Ultimate 4 Oran Zu Love Rappy's Beak Ultimate 4 Pinkal Zu Love Rappy's Beak Ultimate 4 Redria Zu Love Rappy's Beak Ultimate 1 Skyly Crimson Assassin Love Rappy's Beak Ultimate 1 Purplenum Crimson Assassin Magic Rock Heart Key Ultimate 1 Viridia Crimson Assassin Magic Rock Heart Key Ultimate 1 Yellowboze Dark Bringer Master Raven Ultimate 2 Bluefull Baranz Photon Booster Ultimate 4 Pinkal Girtabulu Photon Booster Ultimate 1 Viridia Dark Bringer Photon Booster Ultimate 1 Whitill Dark Bringer Photon Booster Ultimate 1 Oran Crimson Assassin Rambling May Ultimate 1 Redria Crimson Assassin Rambling May Ultimate 4 Purplenum Del Rappy Rianov 303SNR-2 Ultimate 1 Viridia Ob Lily Rianov 303SNR-2 Ultimate 1 Viridia Mil Lily Rianov 303SNR-2 Ultimate 2 Greenill Delsaber Rianov 303SNR-3 Ultimate 1 Redria Gran Sorcerer Rianov 303SNR-3 Ultimate 4 Pinkal Yowie Rianov 303SNR-4 Ultimate 1 Purplenum Melqueek Rianov 303SNR-4 Ultimate 1 Whitill Crimson Assassin Rico's Parasol Ultimate 1 Yellowboze Crimson Assassin Rico's Parasol Ultimate 1 Greenill Dark Bringer Slicer of Vengeance Ultimate 4 Pinkal Astark Slicer of Vengeance Ultimate 4 Purplenum Astark Slicer of Vengeance Ultimate 1 Skyly Dark Bringer Slicer of Vengeance1 point
-
We will all be quad logging Seabed, nobody will speak to each other for 30 days haha. Awesome work.1 point
-
We'll try to clear some doubts about this drop system. DPP = Drop Per Player, the new drop system being implemented. DPR = Drop Per Room, the original drop system that has always been in psobb. DAR = Drop Anything Rate, the chance a monster has to drop an item or not (number between 0 and 100, this doesn't decide which item you get) What is this new drop system? This is a system that gives players individual drops. What you see is yours, what others see is theirs, you don't see other player's drops But why? To solve the issue of players "calling" drops and/or "stealing" your drops. Since they can't see your drops, you don't have to worry about sharing items, although you can do if you want, after you pick up the items. That means if I am hunting with other players we all get the item we are looking for? Not necessarily, here is a comparison between the original system and the new one. First we'll explain how drops work: You kill a monster, The server generates a random number to see if you get anything from that monster (this stage is critical for the new system, where the DAR is used) If you get anything, then the server generates another random number to see if you get the monster's rare item If you don't get the rare item, then you get a common item. Drop system specifics DPR: Someone kills a monster The server proceeds to generate a drop for it If the room gets lucky and gets a drop, everyone in the party sees it and can grab it. DPP: Someone kills a monster The server proceeds to generate a drop for each player in the area where the monster was killed If a player gets lucky and gets a drop, only they can see it and grab it. So being specific, in DPP, each player gets a chance of getting an item different from everyone else. Not necessarily dropping the same item for each player but that possibility exists. That means we get 4 times the chance to get an item in a full room of players? Originally yes, currently not. Originally you (as a whole room) would get 4 times the chance to get a drop, because each player will get a chance of getting a drop, so something has to be done about it and it has been done, which is reducing the DAR to a sensible value so you don't get as many drops but neither none. Current DAR reduction Player DAR 1p = 1.00 2p = 0.67 3p = 0.55 4p = 0.43 How do I use this drop system? This drop system is disabled by default, you can use the following commands /dropstyle = Tells you which drop system is enabled /dropstyle 0 = Disables the new drop system /dropstyle 1 = Enables the new drop system The drop system takes effect on the room, so if you have DPR enabled but join a room with DPP, you will be playing in DPP.1 point
-
{Thanks for the power maser Info. That's something I can't read on Ultima wikia } (... and now I wonder what's the difference between power maser and maser beam xD)0 points
-
Lost Master Blaster.0 points