Junsui
-
Posts
177 -
Joined
-
Last visited
-
Days Won
1
Content Type
Profiles
Forums
Events
Posts posted by Junsui
-
-
Whatcha want for your v502 and CANNON ROUGE +12 [0/0/0/30|30], CANNA BEAST + 12? Haha

-
That's a shame haha!
Thanks for your responses. I guess I'll have to manage it.")
-
1 minute ago, Lemon said:
Get better positioning? Also using Glide targets from back of range, without you target close.
I've tried. On some spawns it seems really small amount of monsters are even getting J/Z such as the cave spawns in Ultima TTF. (maybe I can provide some SS later)
The 'current' J/Z does not keep up with the demand of monsters being spawned and on-going spawns on custom quests. Its not intelligent enough to prioritize non-J/Z monsters over J/Z monsters also.
I have to keep on constantly casting both j/z to insure I hit every monster; along side the ones that are getting defeated. In a chaotic quest with strong monsters, or if I am in a low leveled party it can slow things down, or make it a right mess with people dying, getting smashed etc... Makes me look bad too, as 'i'm not doing my job' properly or whatever, when its the limitations of the game mechanics as a whole. In every sega spawns as far as I have seen J/Z can hit every single one of those monsters, so if it was possible to increase the numbers of monsters being inflicted with J/Z or removing any limitation, I don't see it 'breaking' the game, when its mirroring what's already there but extending it towards custom quest spawns.
I actually thought J/Z was limitless or atleast can inflict status change on a ridiculous amount of monsters; completely proving wrong via custom quests lol. -
I'm curious, any way of 'fixing' or 'improving' Jellen and Zalure? Like on these custom quests with the big monster spawns, J/Z can't keep up with the demand on locking on more monsters then the limit it can do right now (same with most techniques) and obviously you can't choose on what to lock on specifically (usually based on the closest proximity of monsters), but is there a way to increase the limitation or remove it?
Thanks! -
-
Arrest Raygun 30/20/0/0/35 = 1 PD? I'll grab this
-
10 hours ago, Shiva said:
Made by an unknown SchtHack player.
Oh its beautiful, the detail is excellent!
Ty...
-
 1
1
-
-
14 hours ago, Shiva said:

You drew that Shiva?

-
7 hours ago, Lemon said: I was just thinking how ugly those wings were not a week ago! I shall do this today, thanks.
Cool! Any problems give me a shout.
5 hours ago, Shiva said:Texture 0: Front/back
Texture 1: Arms,hands/legs
Those r the only things u need to change in ur tutorial, but so far it's pretty good^^
You might be right with that. I should re-edit my post and check the textures appropriately to clarify it as such. They can get confusing, thanks for that lol. But yeah you don't need to meddle with Texture 0, but with Texture 1 and Texture 2 you do.
I don't have time at the moment but I could personally do the whole lot really to make it easier for people lol... Might do that in a couple of days time.2 hours ago, Frethia Runo said:being another texture editor myself (I use often custimized to myself huds and mix up area stuff with things I like as I need) I would for most parts flat out avoid using photoshop with reguards of editing a DDS file unless you know exactly how to use the dds tools you need to even use them correctly. Paint.net has a natively used dds support and actually has settings for handling the alpha and even mipmaps if I saw right (most I have worked with hasn't needed me to add mipmaps.) however the others saying where things are is right. best bet if you want to remove anything that you don't like on a char. look into if its done by the game itself. (like the stuff the RAcaseal can have removed) as there will be textures for that color showing alphas of those spots. there are some things you can't alpha change. and some textures can be made HD (bigger) but only if you can handle it. there are other good tools as well on the other site with the texture manager. but some other changes are not as so cut and dry.. I would leave other notes for such but yea..
Thanks for the information, you experience is very helpful.
Totally true on the RAcaseal. Since the game already had them removed it was easier for me to identify where to remove them on other RAcaseal textures and if it was possible too. I would actually like to know how to 'HD' textures in this game, and what textures can handle it. I'm not that familiar with the other programmes, but it would be cool for more information to be put down on them -
1 hour ago, Auli'i said:
Your guide is really well made! I like it We need more Texture Guides uploaded to this forum in my opinion
Someday I'll publish mine..
Heya!
Ahhhh! Thanks for your comment Hopefully its quite easy to read and follow, especially for my first one. It was a bit tedious but was fun to make.
I agree! I bet there is some nice textures and techniques people are holding on too; whilst it should be widely available for others to try out, experiment and maybe improve upon.
Looking forward into seeing yours 'someday' lol -
55 minutes ago, Soly said:
That has been suggested before and I have it on the list of things to do
+ Banner when player reaches level 200
+ Items picked up (PDs alone), used (some of them), bought from - sold to shops
+ Distance walked
+ Idle time
+ Chair time
+ Distance in chair?// This is now possible with the quest timers!!!!
| Recording runs - time taken, monsters killed, party information, etc
| Quest times playedThanks and the todo list sounds good!
48 minutes ago, mudkipzjm said:I think people would get sick of seeing my name, lol.
I only recognize your forum name, whilst all your other names are different or similar.
 Also, if they're already 200, then no name banner for j00 ahha!
-
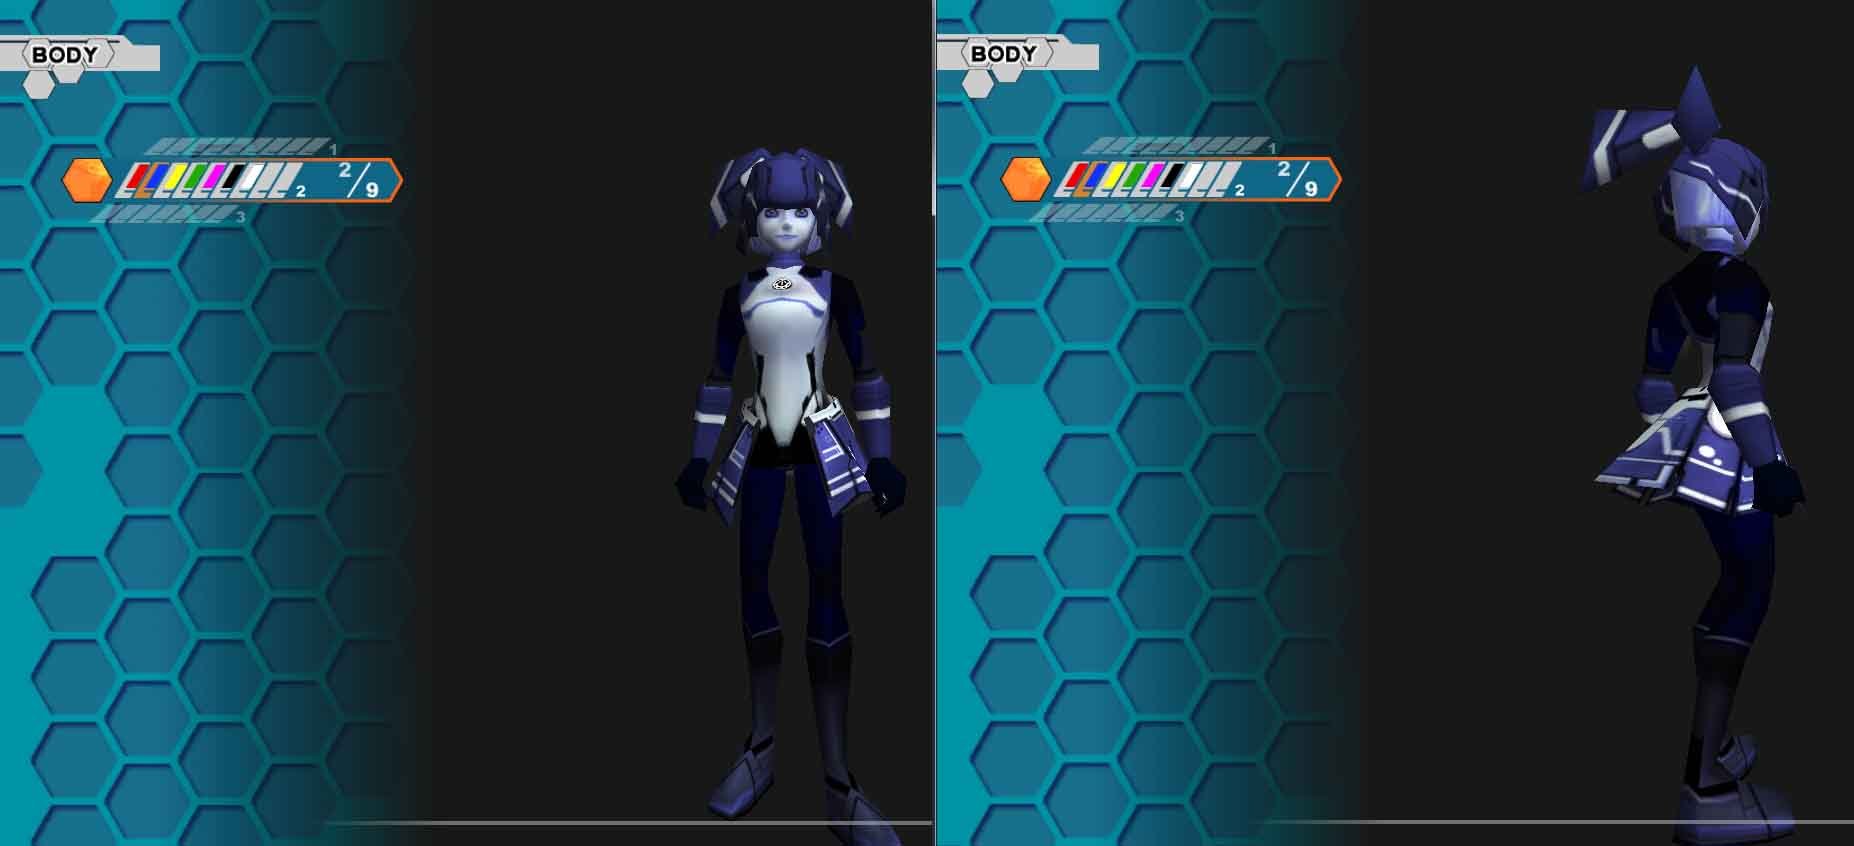
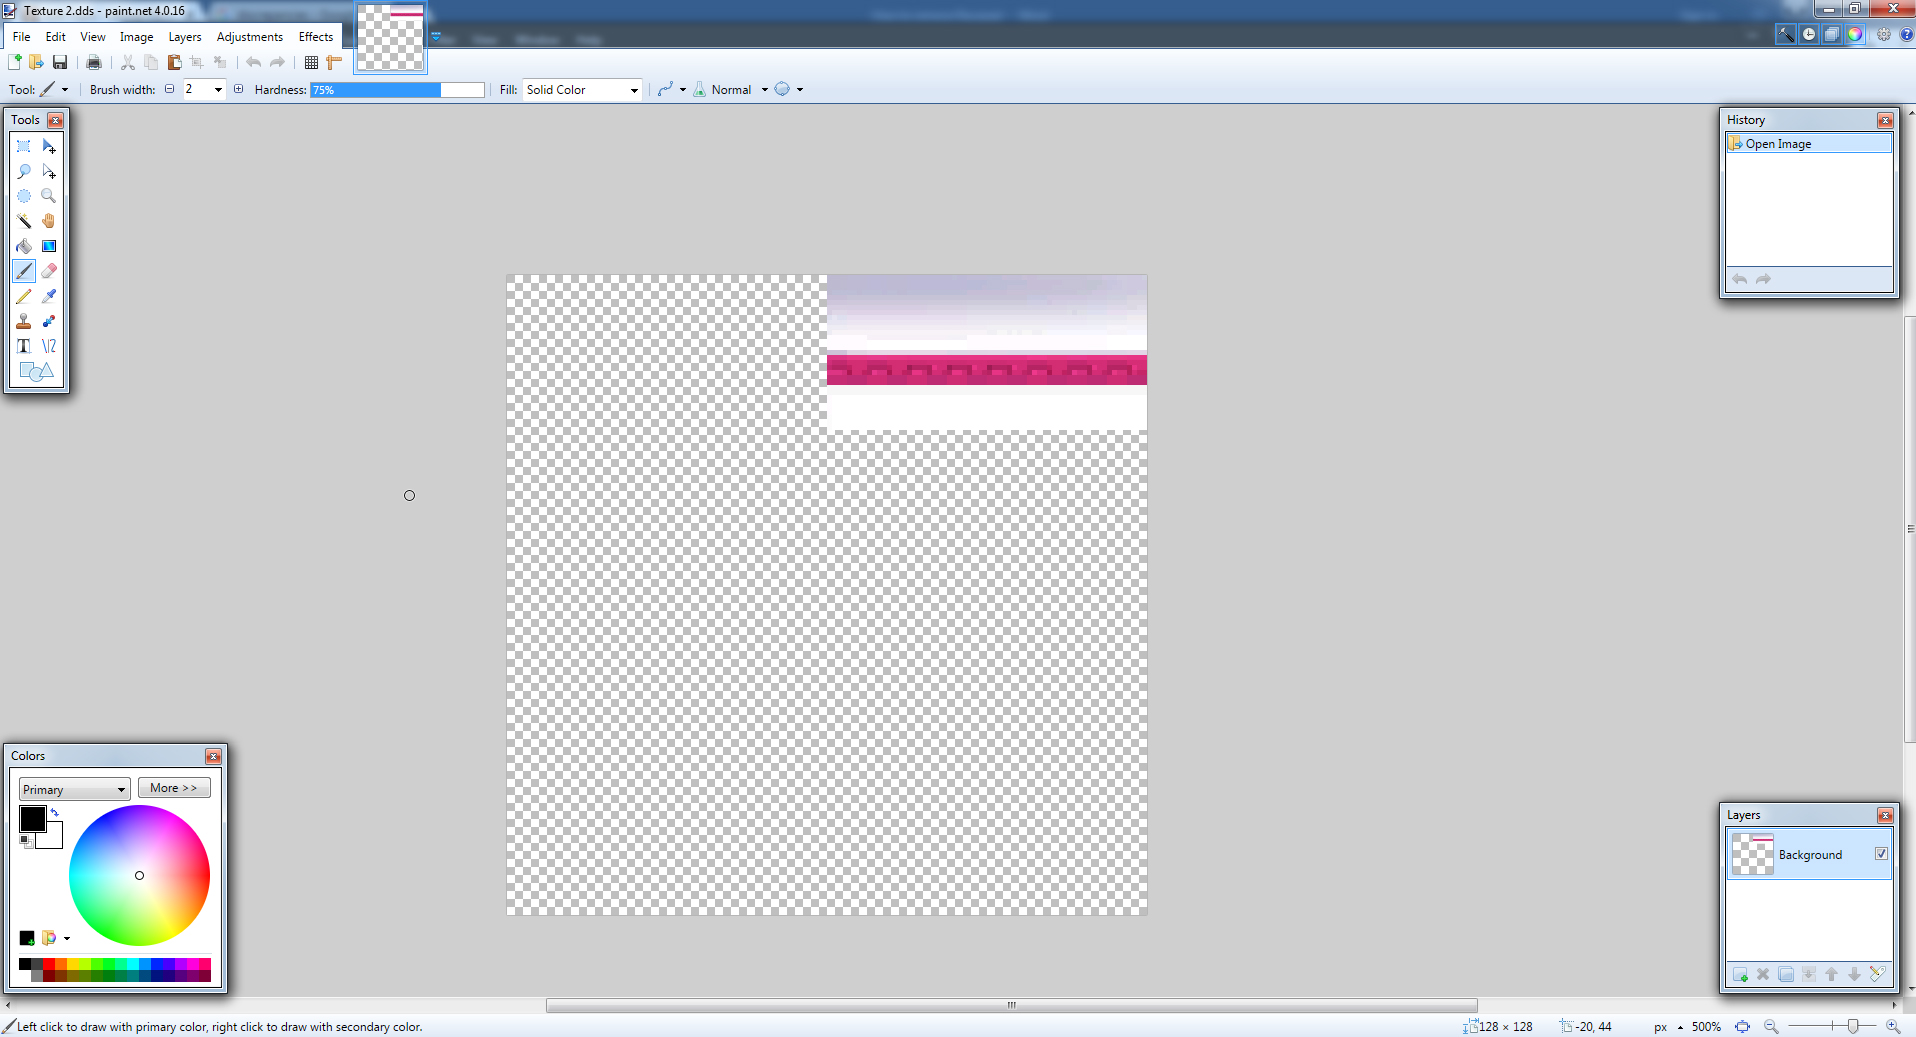
Hello and welcome to this tutorial. I will be going through some easy to understand processes of how one can remove the shoulder, back pads and skirt from the RAcaseal costumes, by deleting certain parts of the costume textures. This is my first tutorial so go easy on me if there are any errors :).
Programmes required:
Paint.Net - https://www.getpaint.net
Texture Manager - https://psoskins.jimdo.com/tools/
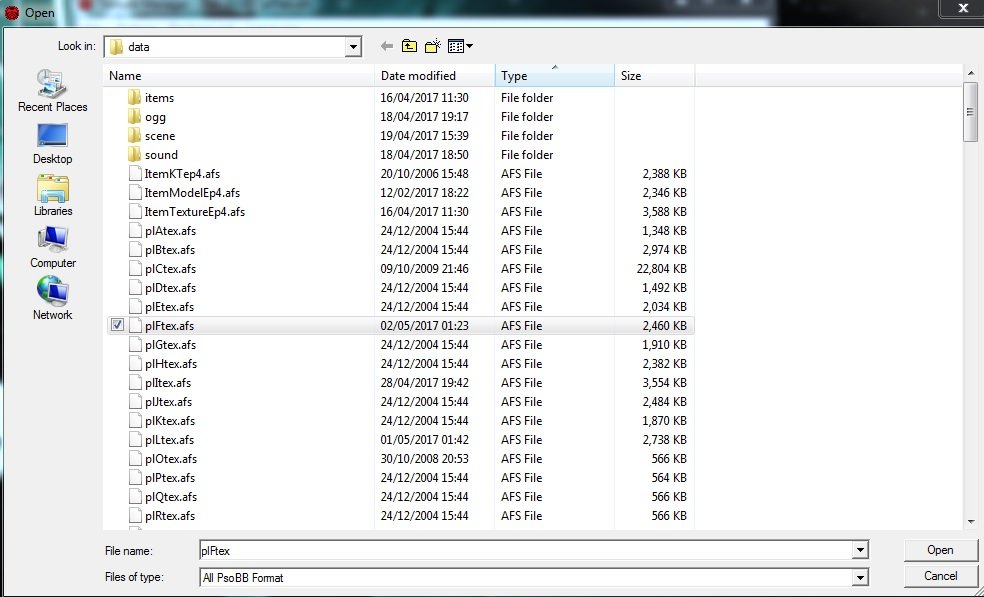
Open Texture Manager > File > Load > Go to your ‘Ultima PSOBB directory’ > Data > plFtex.afs (RAcaseal textures)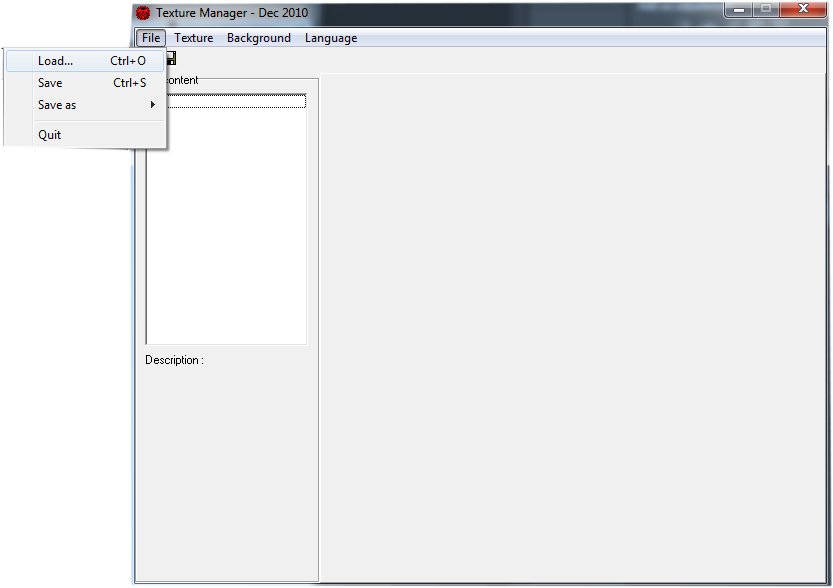
There’s a few ways you can do this tutorial but I think, its best and easiest if you choose your desired character costume as ‘default’ because this will be for what people will see you as. You don’t want to choose something fugly for their eyes but good for yours (when you apply the new modified textures). Might as well kill two gal gryphons with one blue black stone and look good for all.
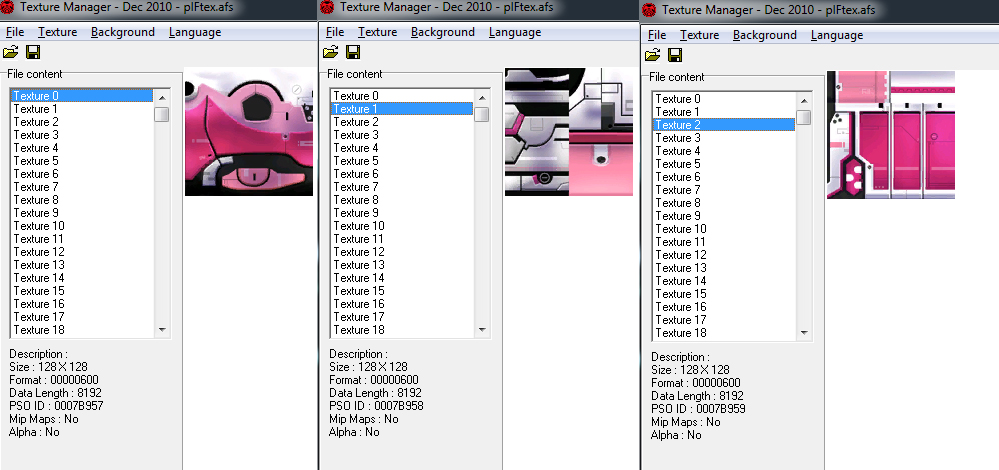
For this tutorial, I will be using textures: 1 – 2 which should cover the back, legs and skirt.
Texture 0 = Front (won’t be using but just highlighting it as such)
Texture 1 = Legs/Back
Texture 2 = Skirt
These textures in that order correspond throughout the RAcaseal texture folder. So just find what costume you want as default by looking at what color it is and change it by using this tutorial. If you are skillful enough you can choose your default costume and import the other RAcaseal textures onto that ‘default class’ and modify it from there. This will allow you to have unique mix of the various RAcaseal's constumes textures available on your character, so enjoy experimenting with that.
Highlight the texture you want, for example Texture 1. Then click Textures > Export DDS > Texture 1
Repeat the same procedure for Texture 2. Texture > Export DDS > Texture 2
*Place your textures in a folder on the Desktop or something. Create an additional folder within that folder and rename it: 'Backup'. You can either copy and paste the 'plFtex.afs' from your Ultima PSOBB folder > data' or the textures you will exporting. This is to back them up in-case you mess up when experimenting.
Load up Paint.net
File > Open > Texture 1
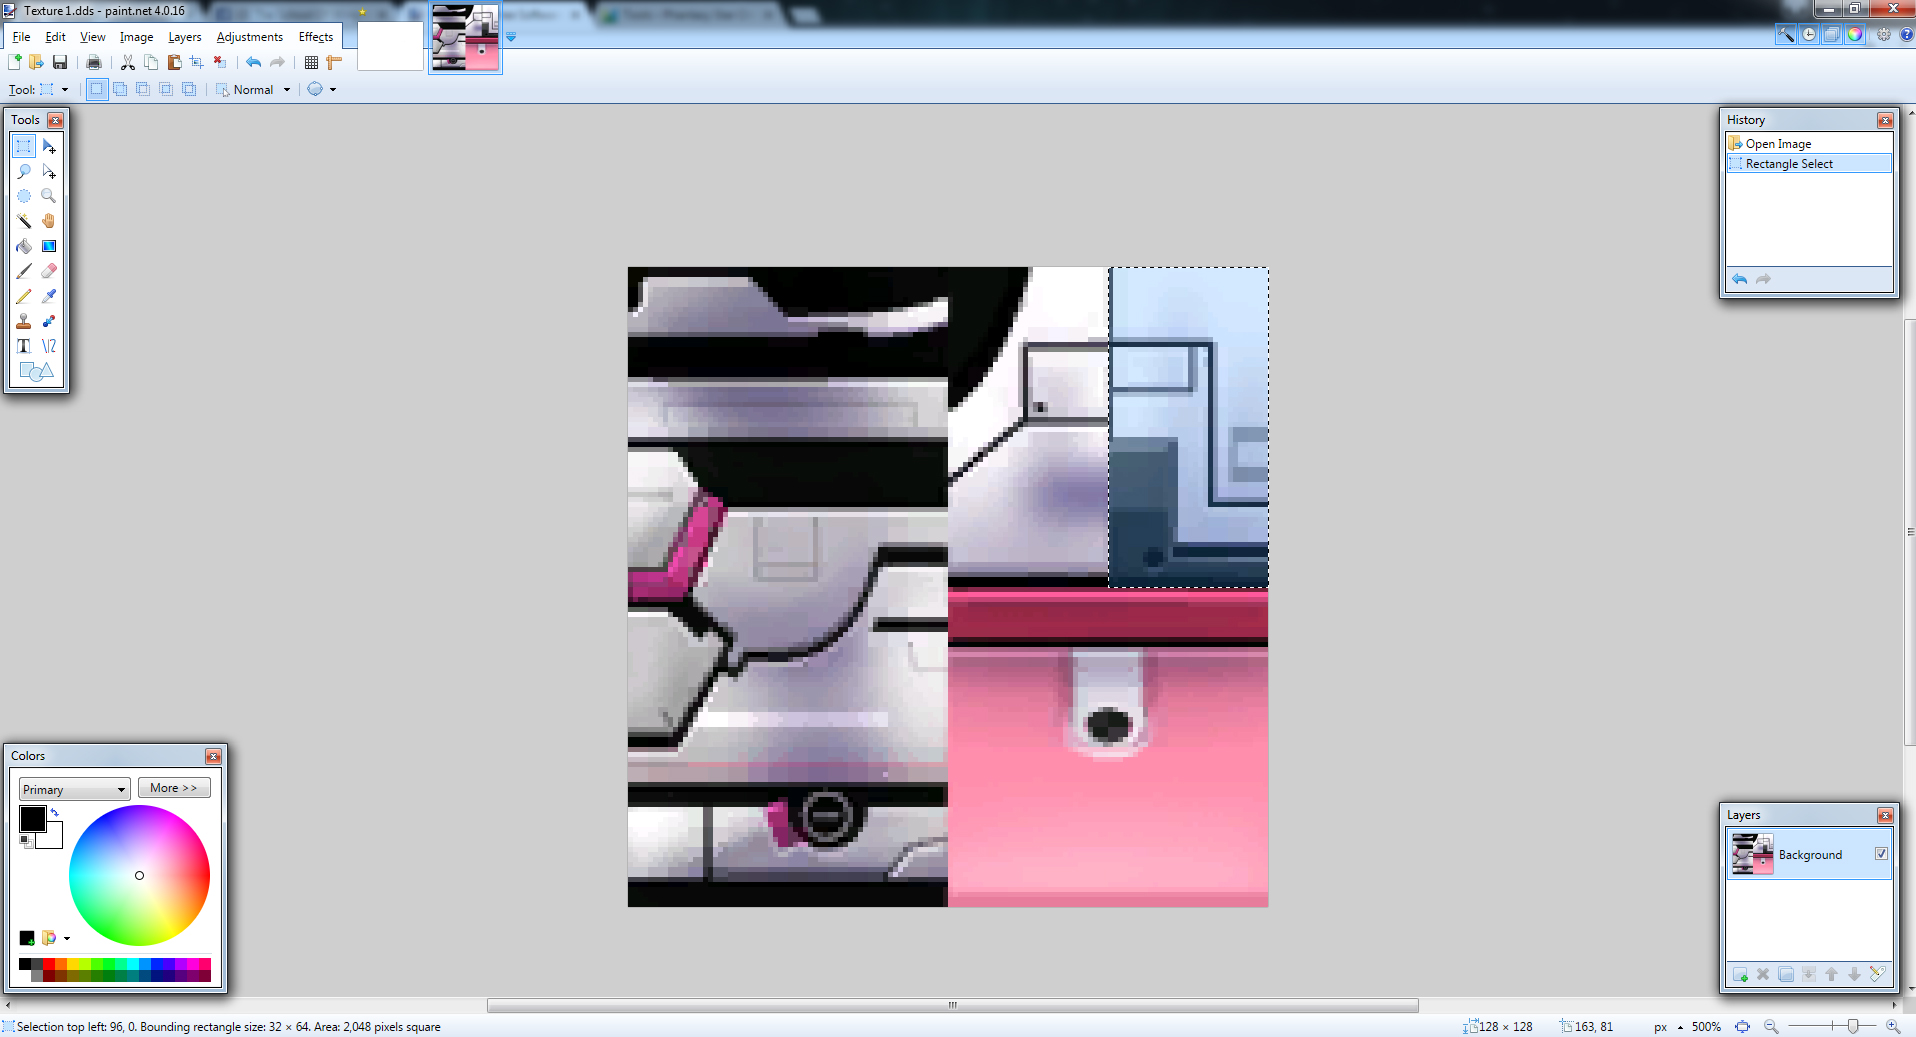
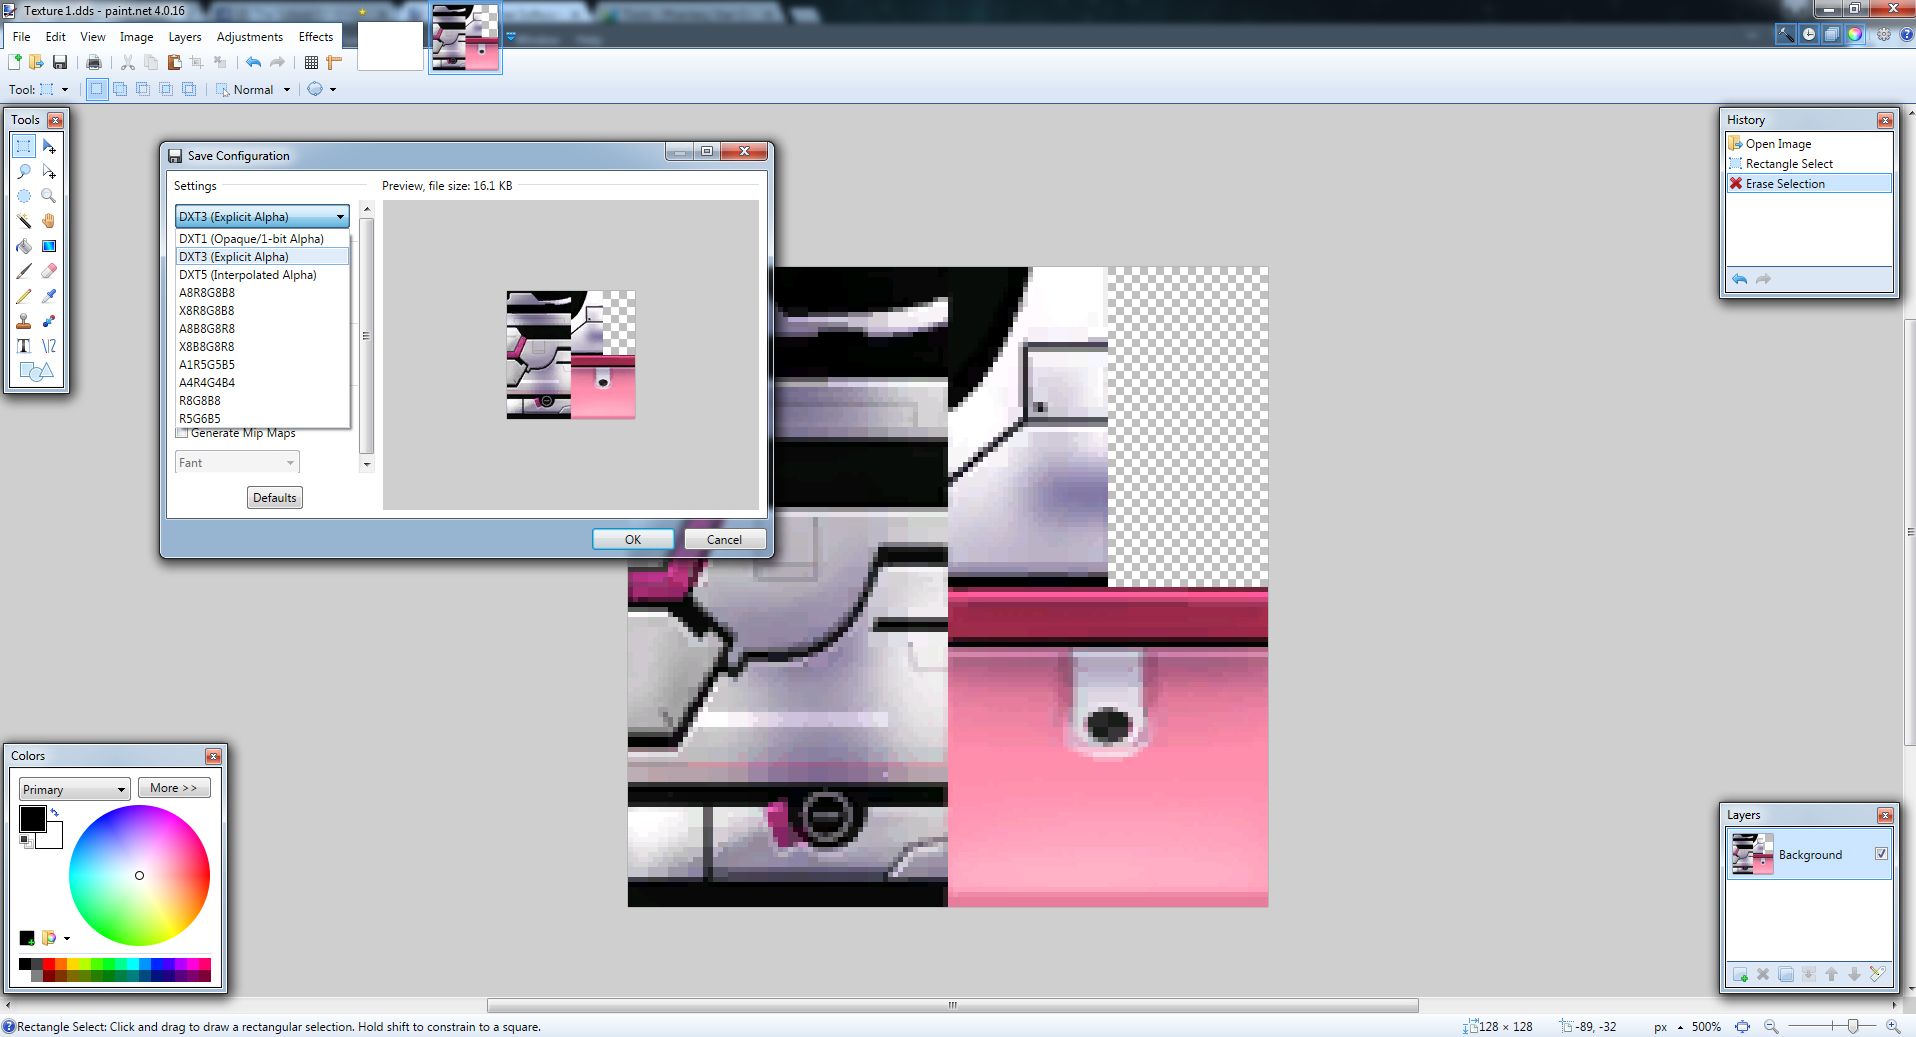
Zoom in by (ctrl + wheel mouse) on Texture 1. Delete this part of the texture by using the rectangle select tool (at the top left hand-corner of the tool box).
Highlight the part as seen in the picture and press delete. Make sure you remove all the parts that connect to that part of the texture. This has deleted the ‘shoulder pads’ on a RAcaseal’s costume as that little rectangle is where the should pads texture for a RAcaseal are located.
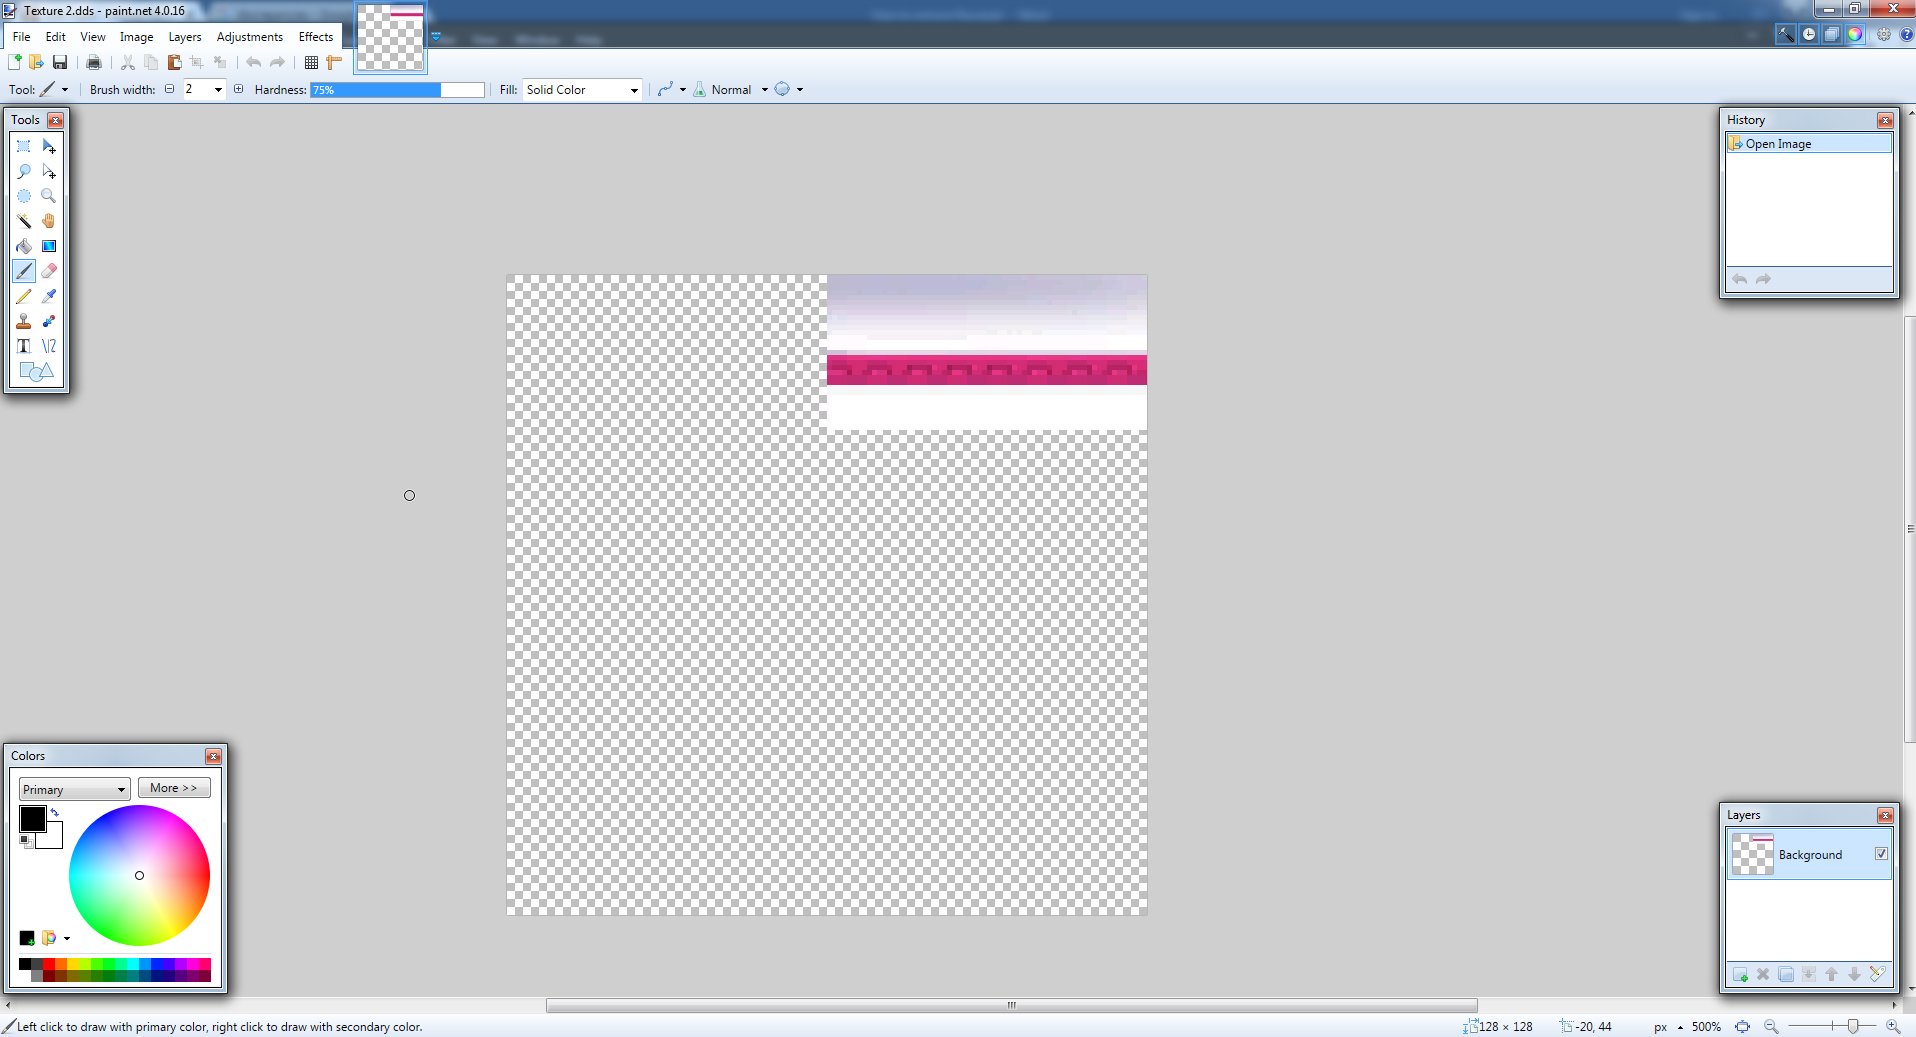
Now press Save and go to the drop down menu and choose DXT3 (Explicit Alpha). I’m not that knowledgeable on Alpha’s at all etc but this one just works for this tutorial (I've played around with the other settings and they didn't work, except for the first one too if I remember correctly). If I choose the DXT5 for example and upload the texture into texture manager it will have horizontal lines on the texture and thus not the desired outcome we want. This setting: DXT3 (Explicit Alpha) preserves the transparency when uploaded into texture manager thus in the game also.
Now once saved. Go back to Texture Manager and go to the actual texture of the one you just exported for example Texture 1.
Then press > Texture > Import > DDS > Choose Texture 1. The texture you just imported should of replaced the existing one. The final step is to make it to work in game and this is done by pressing the save button (floppy disk icon) on texture manager.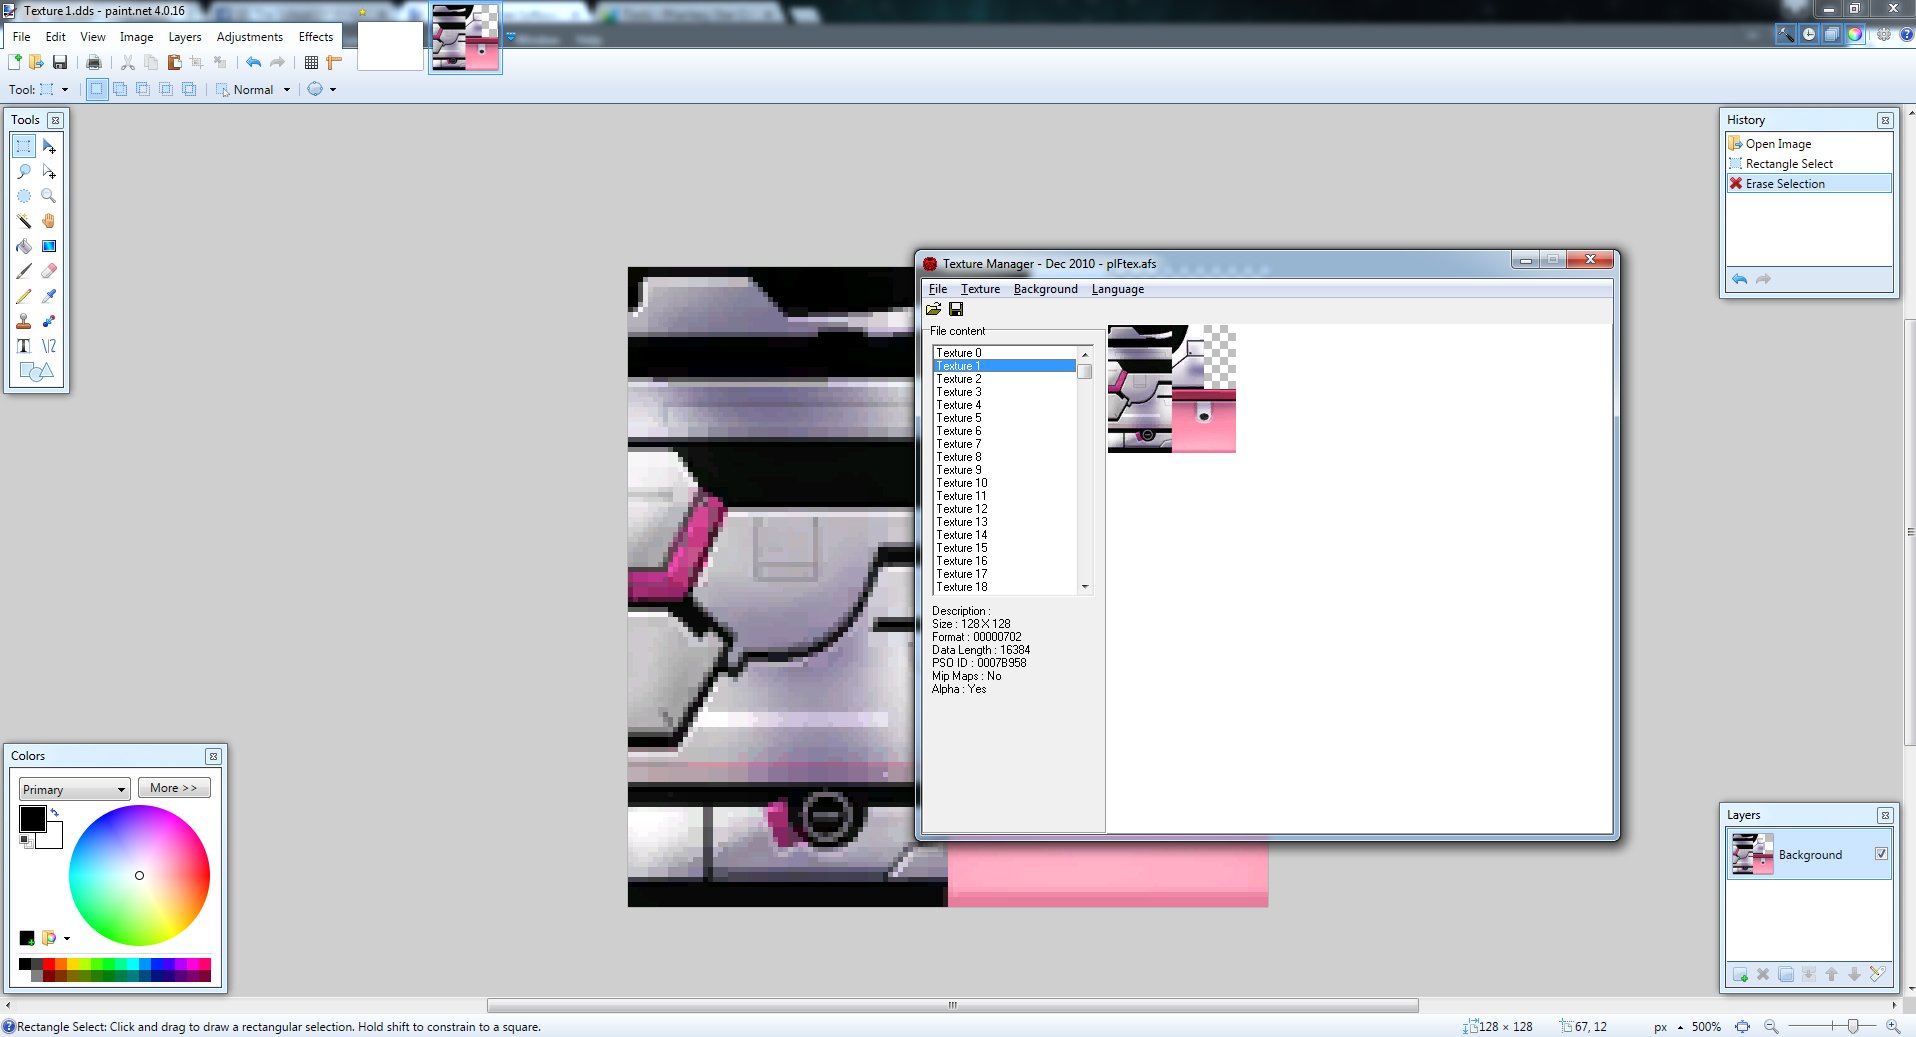
That’s it for Texture 1.
Now for the back pads and skirt you just repeat the same protocol with a few discrepancies.
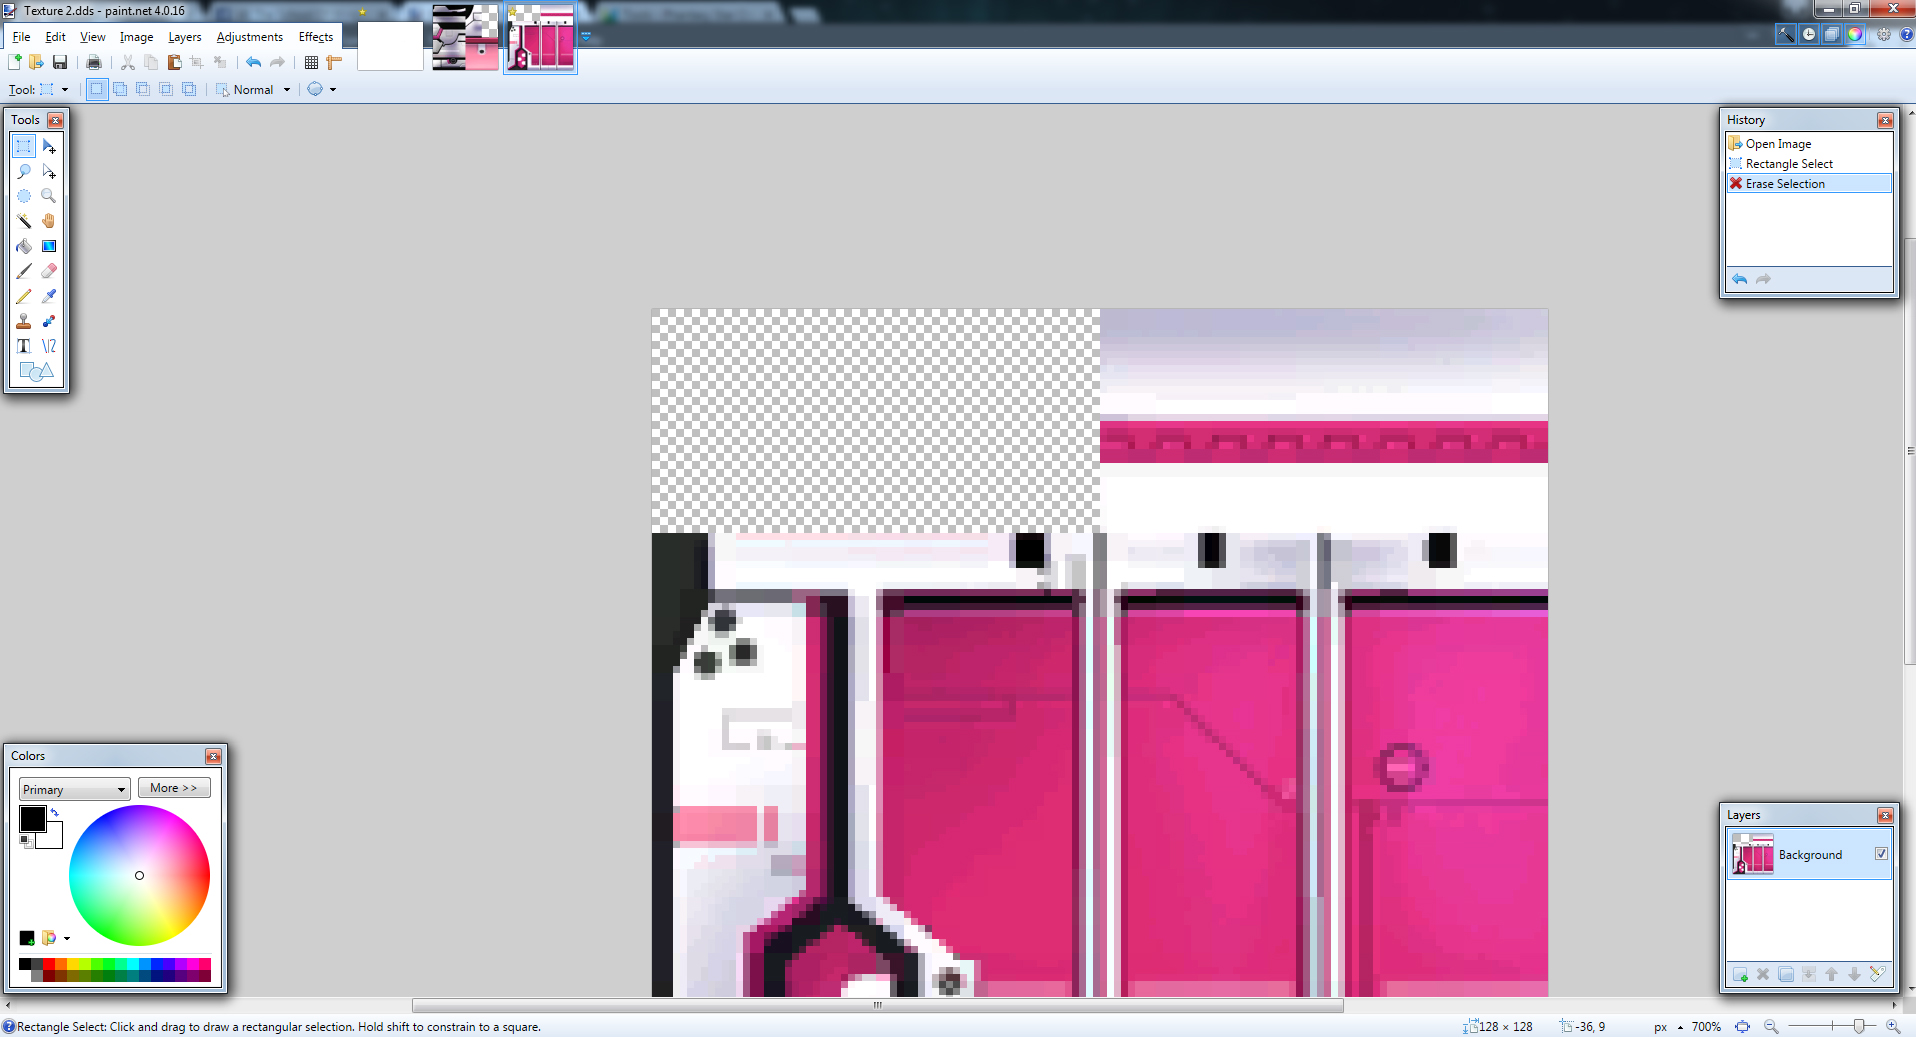
Paint.Net > File > Open > Texture 2
Again use the rectangle tool, highlight and delete this part of the texture.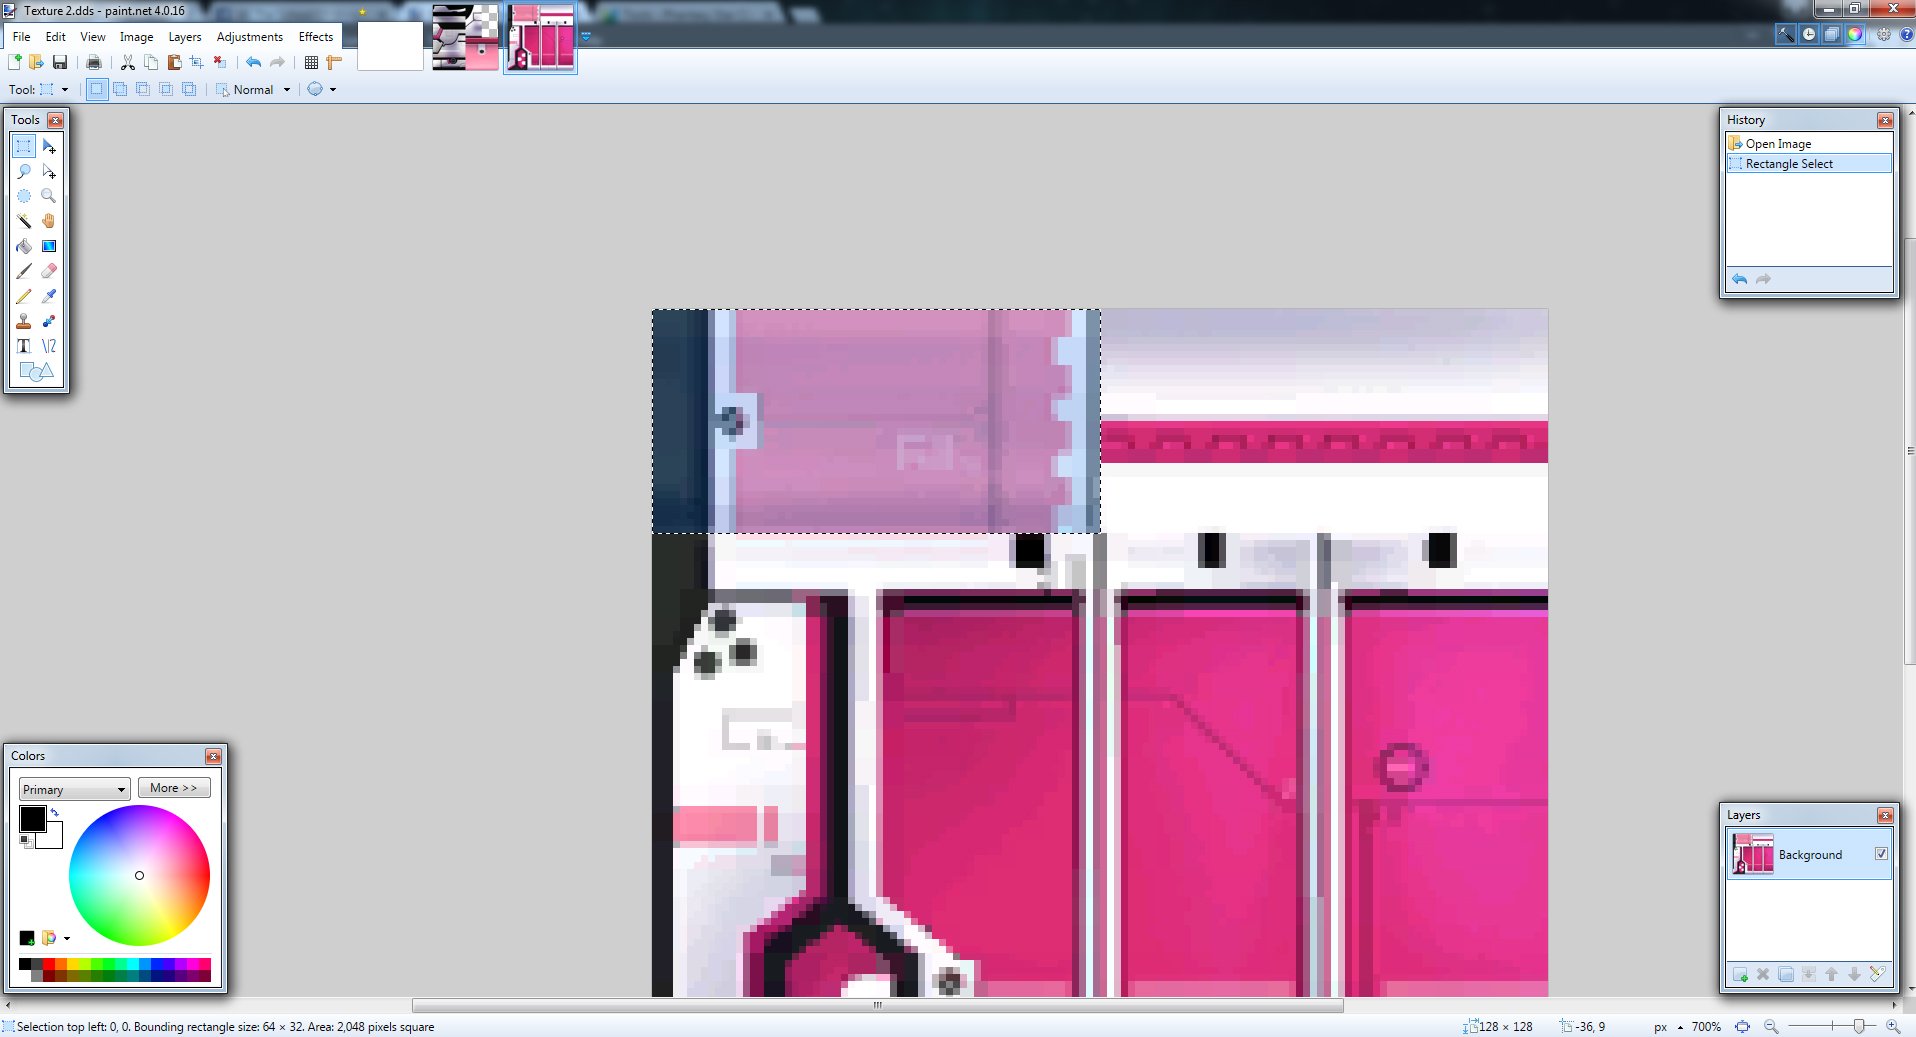

This rectangle is the 'back pads' of a RAcaseal costume.
Now repeat the saving steps.
Go back to texture manager > Import > DDS > replace previous texture and hit save.
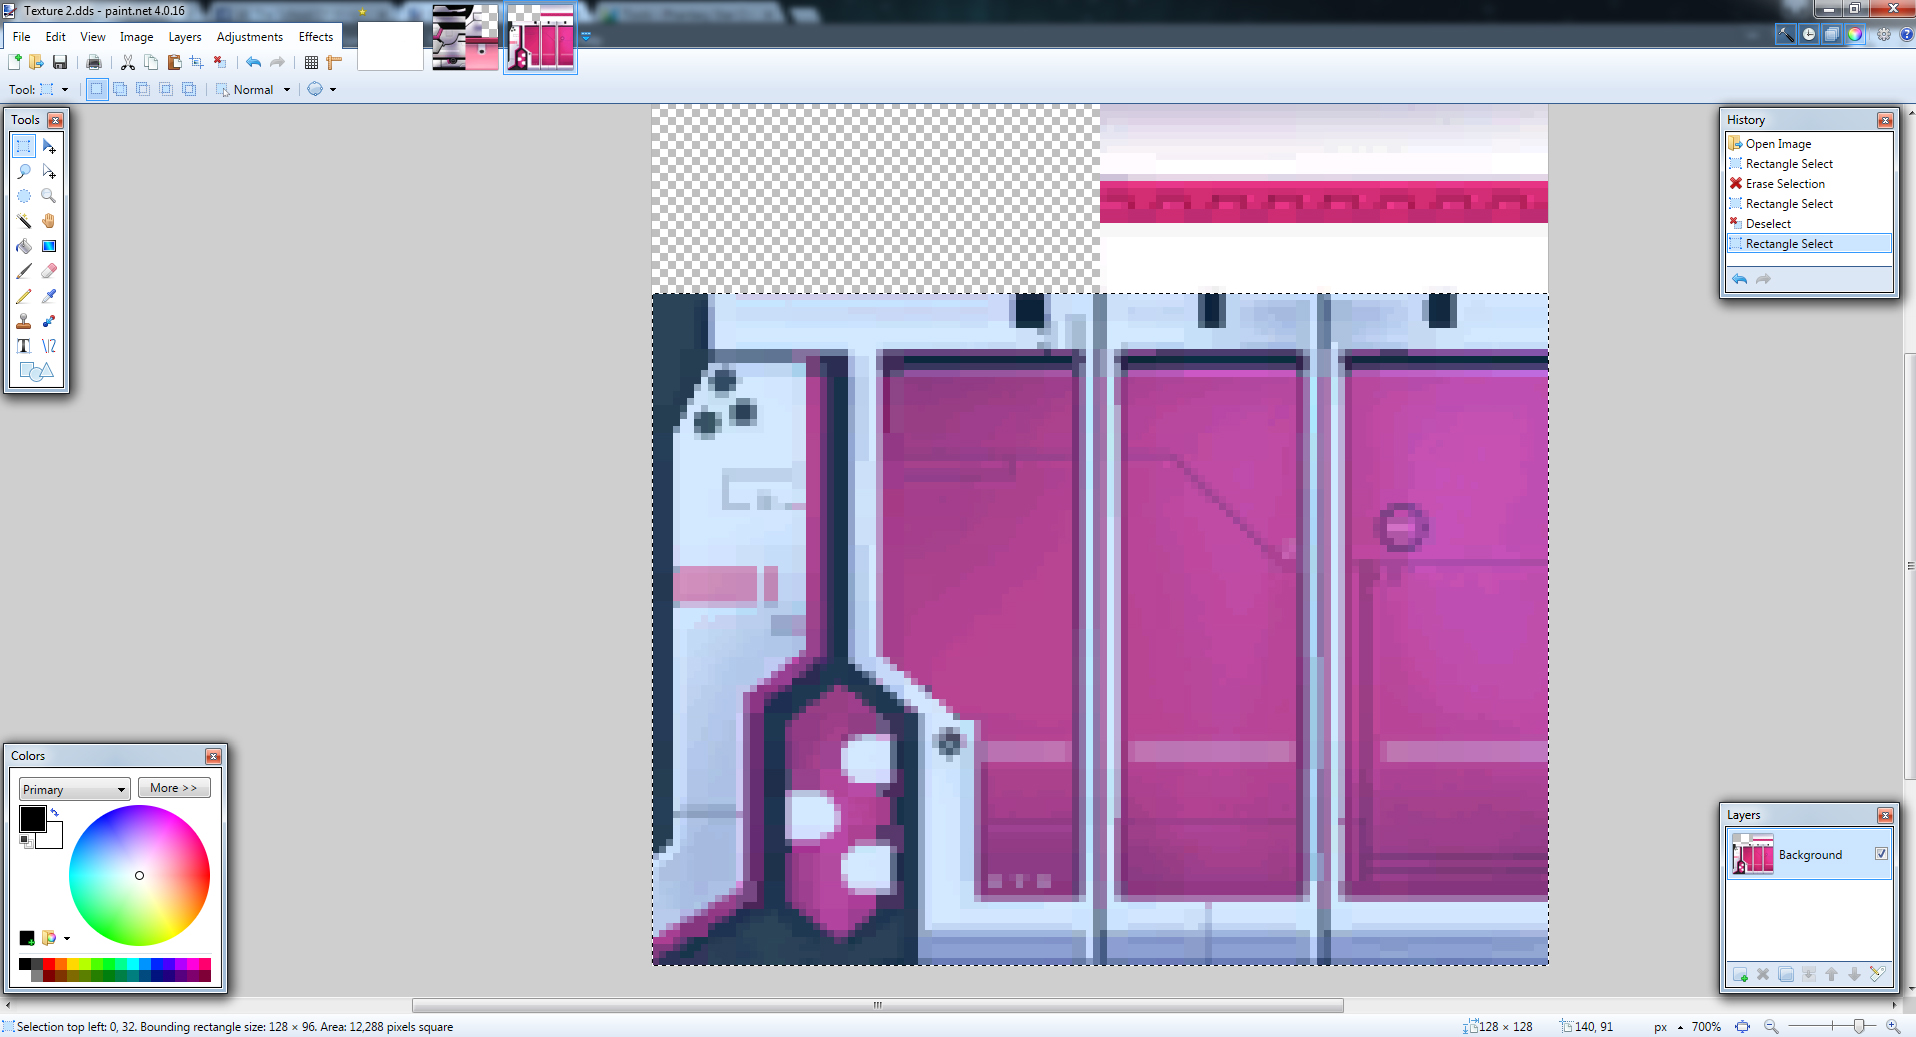
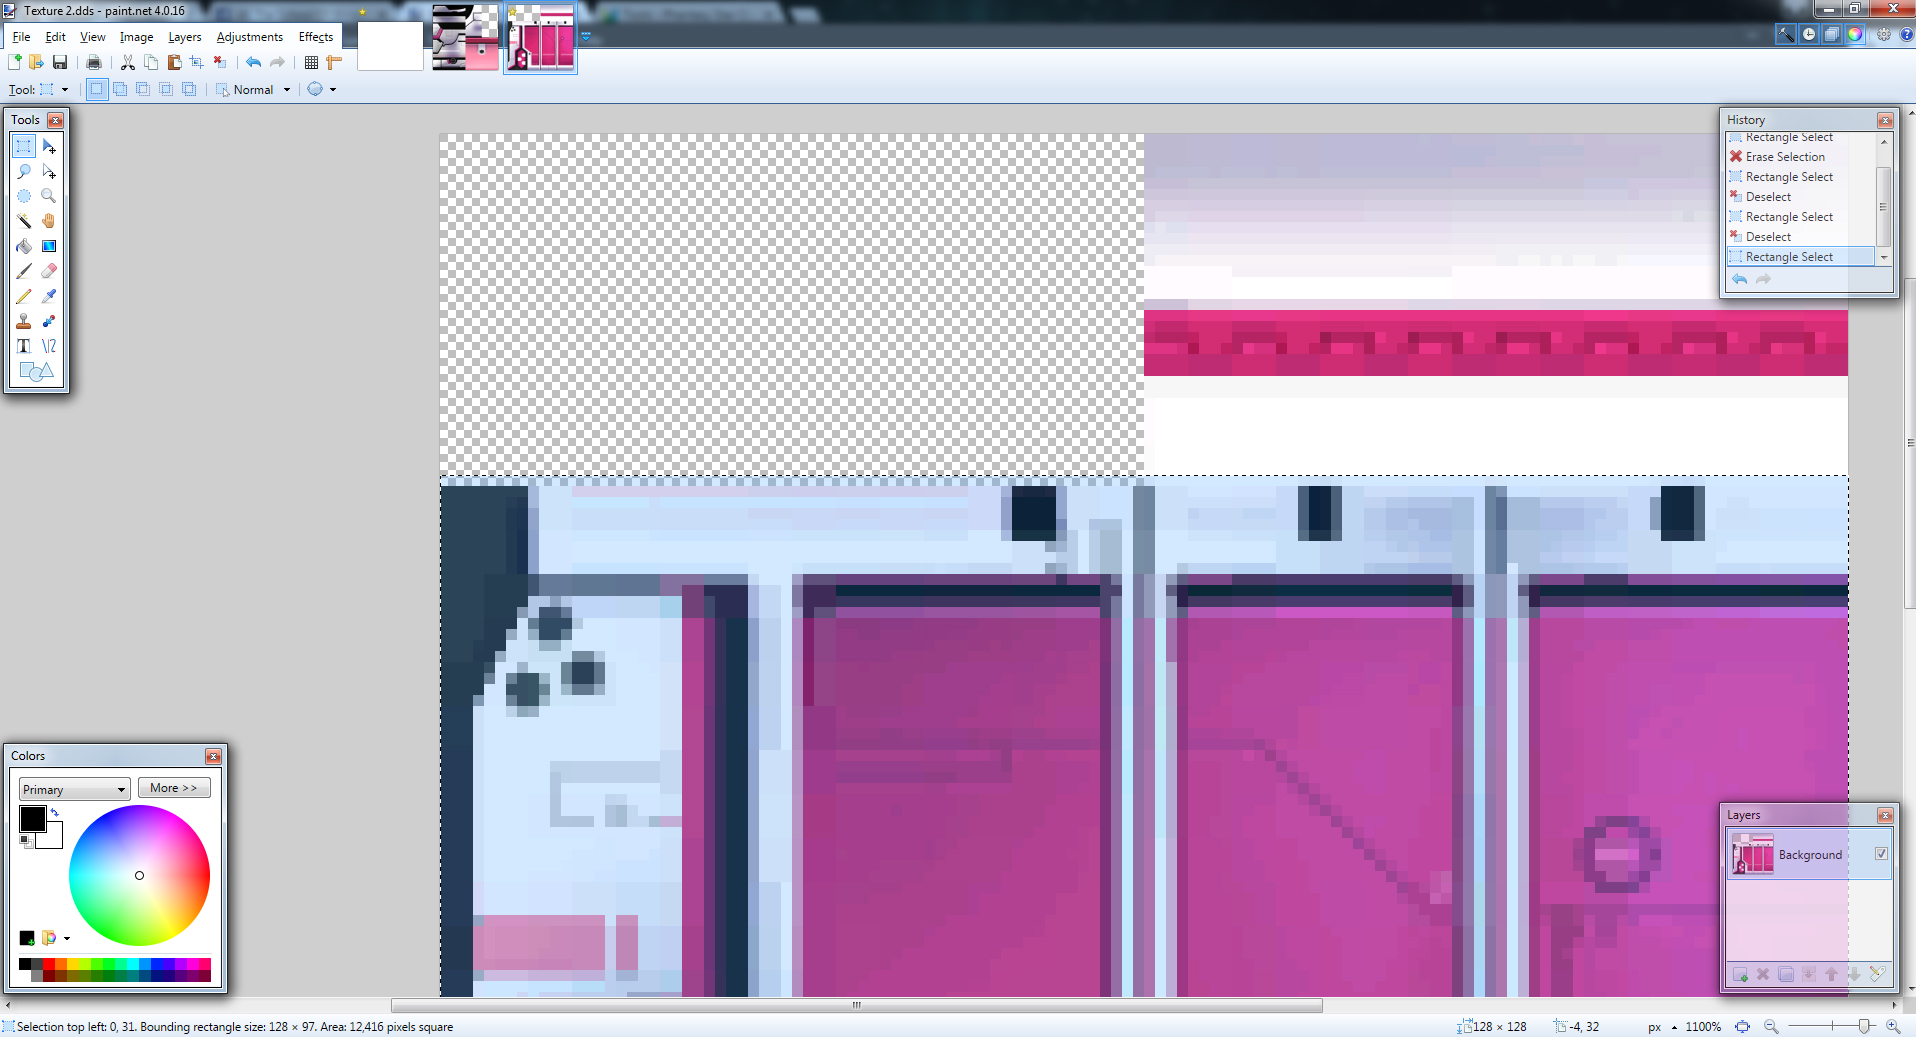
Now to remove the skirt we have to use Texture 2 again. So at this point feel free to make another copy of texture 2 (the one you modified for the backpads and stick it in that 'backup folder'. Make sure you stick another letter/number in the filename otherwise it'll override the previous one).
Load up Texture 2 into Paint.Net again.
Use the rectangle tool, highlight the area that is shown in the screenshot and hit delete. You have to go like 1 pixal above the texture to get a clean cut in PSOBB, otherwise you'll have some texture illustrating the edges of the 'back pads', even though you're deleting the skirt.

Save using same settings.
Go back to texture manager > Import > DDS > replace previous texture and hit save.
Load up PSOBB and select where your 'default costume' is located.
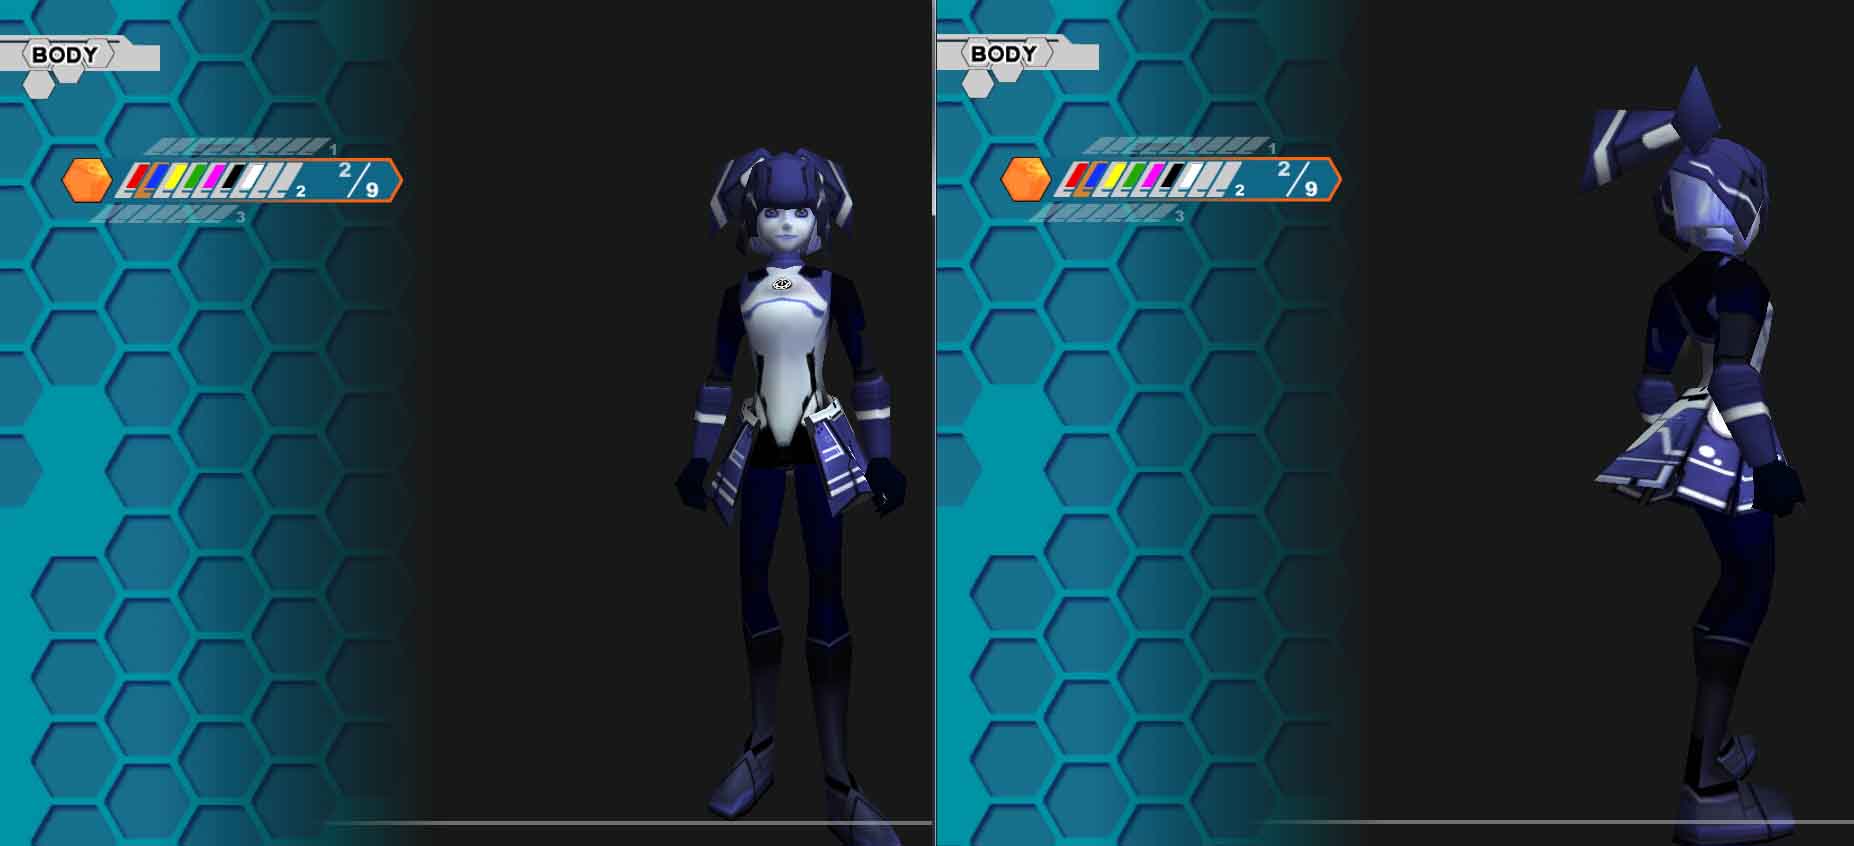
This is the effect I got by using this tutorial and you should expect the same result.
For my RAcaseal, I have decided on deleting the shoulder and back pads, whilst I kept the skirt on. You can change colors too by using Paint.Net or Photoshop (but make sure you import the recolored texture back into Paint.Net and save it using the same ways as above. For some reason using the 'alpha settings' in photoshop doesn't work). You can even import other costume designs into your ‘default’ costume and then play around with the colors, and delete the necessary bits too for your desired outcome.
For me, I took 8/9 costume and imported it into 2/9 (my default selection) and then changed/modified the texture to my liking: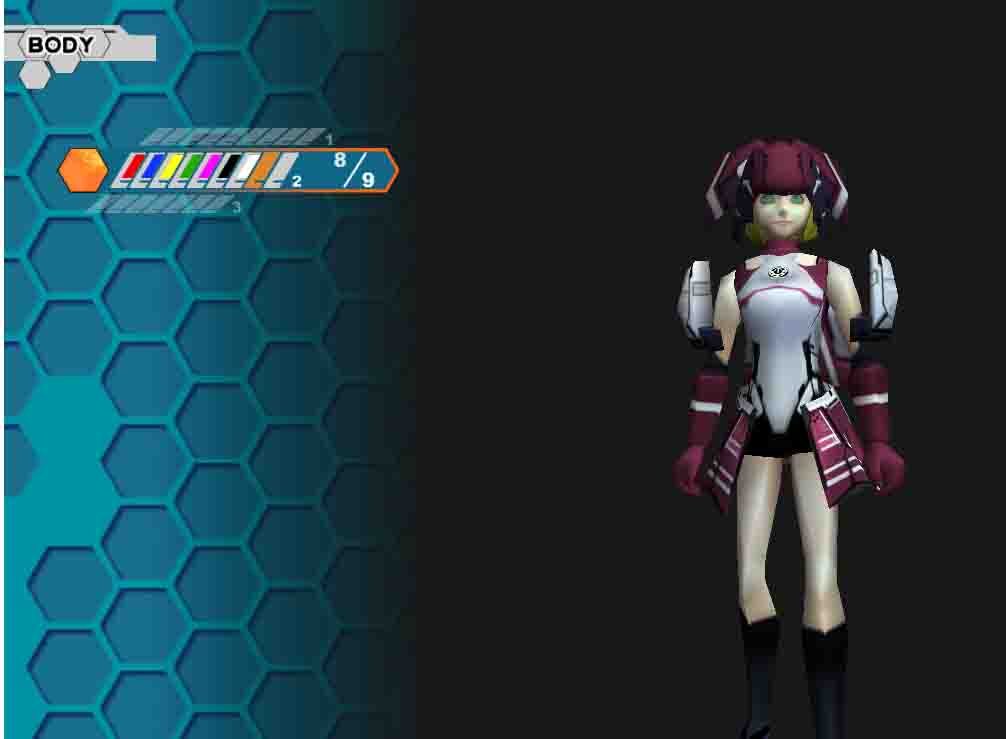
This ends the tutorial. I hope it helps and is easy to understand/follow.
Any questions, hit me up below!-
7
-
-
27 minutes ago, Fyrewolf5 said:
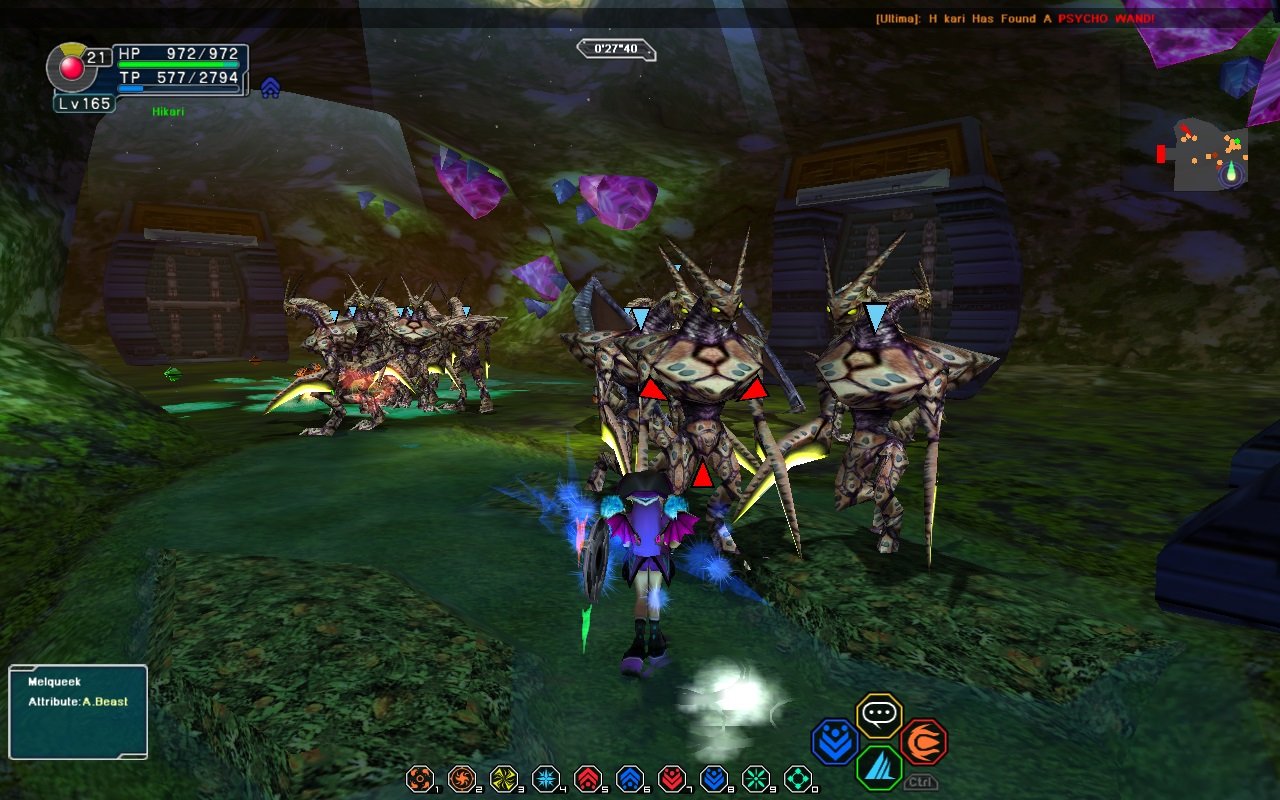
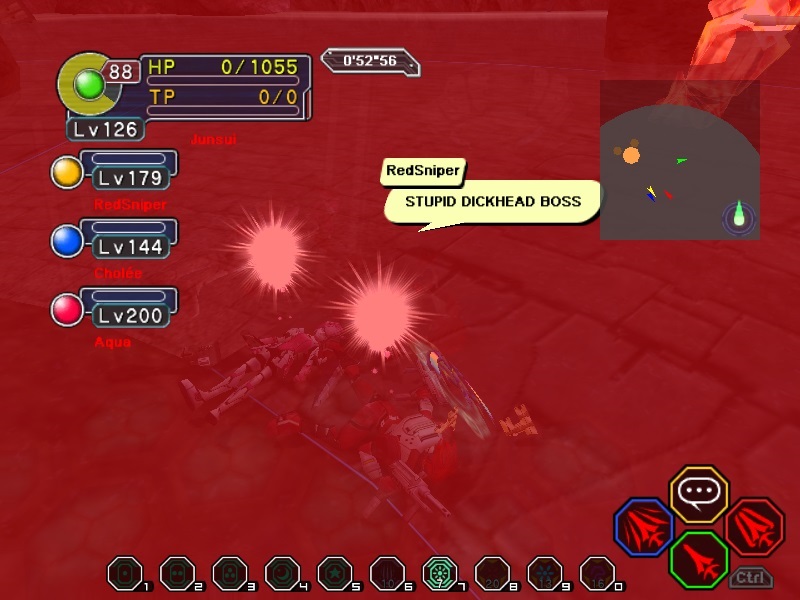
Tip: when olga flow body snatches someone and turns them into flowen, he must be damaged with a weapon that has specific attributes (native/abeast/machine/dark) or he will reflect all damage onto the player. As for what attribute he is, you'll have to try to work it out with what you have (be sure to bring weapons, preferably ranged ones, that cover all attributes). When he gets hit with the correct attribute, he turns darker for a moment and lets out a yell, and does not reflect damage onto the targeted player. He also changes his technique weakness between fire/ice/thunder/light as well, and the correct element will also have the same effect. It's an interesting gear check to see if you have well rounded gear.
Ahhhhhhhhhhhhhhhhh!!! So that's how you do it again. Thank you very much man for the tip. Its been years since playing PSO and something as meticulous as this can easily be forgotten. <3
-
Not exactly improving the server but just was in Orgodemrk's Level 200 game (congrats!) and I thought it would be cool if the 'Server Announcement' announced when people achieve Level 200 such as like finding high level rares.

-
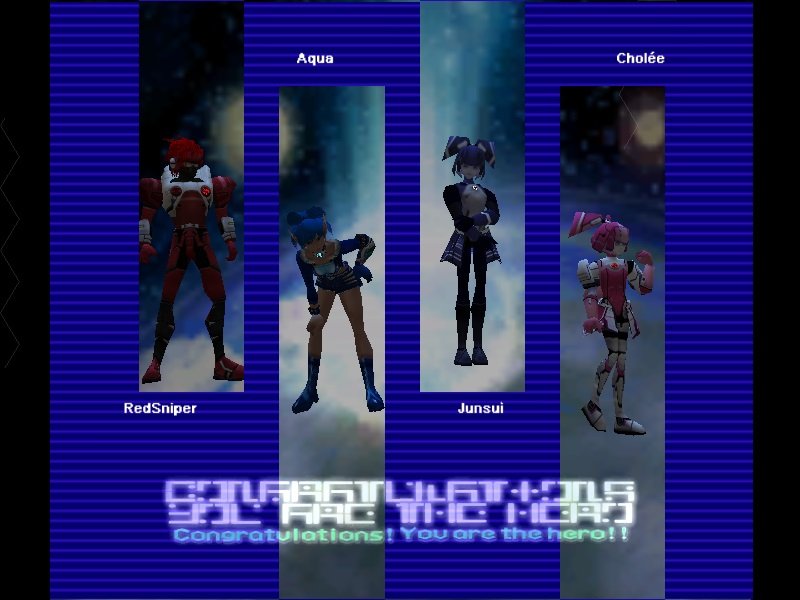
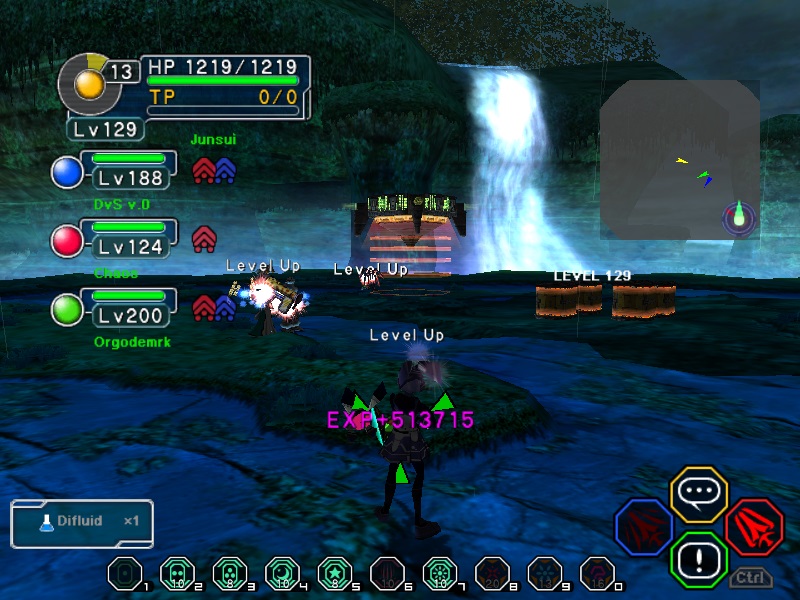
Joined a random game and we did a TTF. Nice surprise at the end <3! You know when you have the feeling something will drop and it does? Delicious!
One of those arduous PSO games where you're out of mates, fluids, moons, and resorting to using PB's to revive/heal and dodging like crazy. Olga Flow kept on spamming his body snatching ability, so we couldn't do anything at all for ages, then we all died but came back stronger and finally put down the mighty foe once and for all!
Took over an hour to do the RT it xD lol.
-
4
-
-
Just now, yanvbraz said:
@serverus is a master troll xD. He just said that to free up lobby 1 so he could join and afk there.
Really? LMAO!
"free up lobby 1 so he could join and afk there." - Ahahaha! Sounds like what a Cat would do, to smite all the other dogs.
Nevertheless though, you can't win. If you don't go, you might not get something, if you do, you might get trolled xD! I think the best option is the multi-client, atleast then you're staying ahead of the game lol. -
2 hours ago, yanvbraz said:
Hahahaha!
Well I was smart enough to multi-client and had one character AFK in the lobby, and another hunting for stuff!-
1
-
-
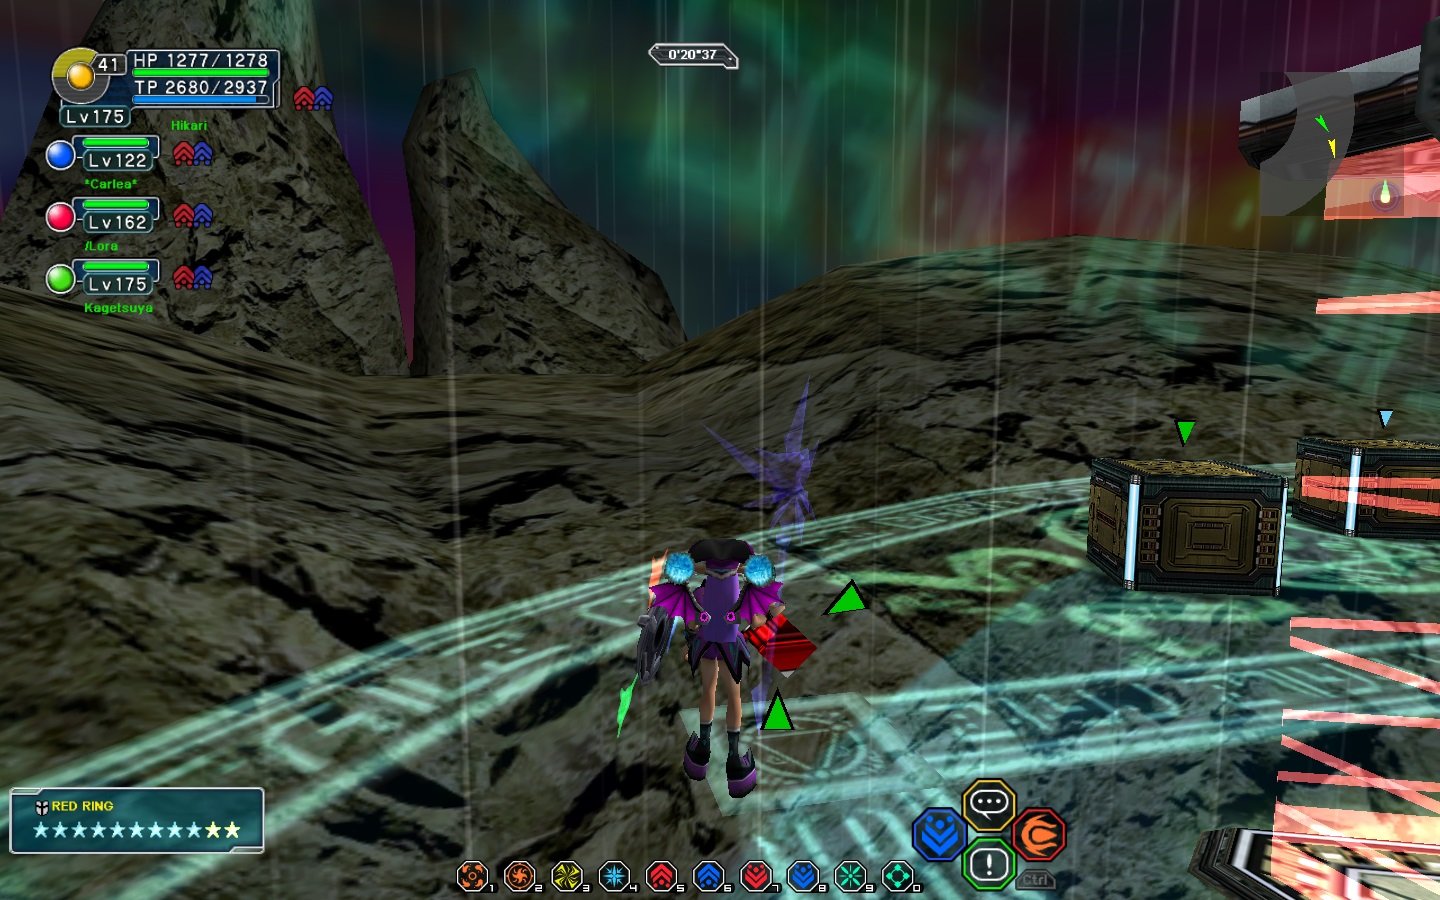
Finally got the Psycho Wand, after having a Luck Material and a Photon Drop from the bugger lol.
Also lol:

There was a few of us who came to Lobby 13 and we stayed there for over an hour or so; not one GM showed up


-
3
-
-
Thanks Dio and Radez for the trades
-
( ͡° ͜ʖ ͡° )つ──☆*:・゚ "Welcome one and all!"
Thanks for checking out my tradelist! *Snacks* is code for weapons, armors, shields, units, techs and others.
The items that are listed below are just the rares/non-rares I have collected over the course of about a month or so, since I started here. I hope something is of your liking.
WANTS
1) Photon Drops,
2) Power Materials,
3) HP Materials,
4) Luck Materials,
I don't think I'll get much for what I got, but feel free to offer anything else and whatever you want to pay for the stuff. I am sure we could negotiate prices/trades; don't be afraid to ask!(っ˘ڡ˘ς)
WEAPONS
Gladius [0/0/50/50|30] [Arrest]
Gladius +1 [40/0/0/0|40] [Charge]
Claymore +6 [0/50/0/0|50] [Frost]
Calibur +1 [0/0/0/0|35] [King's]
Calibur [0/0/0/0|40] [Blizzard]
Edge +8 [0/5/0/0|50] [Fire]
BLADE DANCE [0/0/0/10|0]
Gungnir +5 [20/0/0/0|50] [Charge]
Gungnir +5 [20/0/0/0|50] [Charge]
Gungnir +5 [20/0/0/0|50] [Charge]
GAE BOLG [0/30/40/0|0]
GAE BOLG [0/25/0/0|25]
Cutter +4 [0/0/0/5|50] [Mind]
Diska +7 [0/0/50/0|40] [Berserk]
Diska +3 [0/0/0/0|25] [Berserk]
DISKA OF LIBERATOR [0/0/0/0|40]
DISKA OF LIBERATOR [0/0/0/0|40]
DISKA OF LIBERATOR [0/0/0/0|0]
DISKA OF BRAVEMAN [0/0/15/25|0]
IZMAELA [0/0/0/0|0]
Raygun +8 [0/0/0/40|35] [Berserk]
Raygun +4 [0/30/0/0|0] [Chaos]
Raygun +6 [25/0/0/40|40] [Dark]
CUSTOM RAY ver.OO [0/0/0/0|0]
Laser [35/0/0/0|55] [Havoc]
Vulcan +5 [0/25/0/0|50] [Heart]
Vulcan +2 [0/20/0/15|30] [Hell]
Vulcan [0/0/25/0|25] [Geist]
Vulcan [0/40/0/20|35] [Berserk]Vulcan +1 [0/45/0/0|40] [Hell]
L&K14 COMBAT +20 [0/45/0/0|50]
L&K14 COMBAT [0/35/30/0|0]
L&K14 COMBAT [0/30/0/0|40]
L&K14 COMBAT [15/0/0/15|0]
L&K14 COMBAT [0/10/0/0|0]
L&K14 COMBAT [0/0/0/0|35]
L&K14 COMBAT [0/25/0/0|30]
L&K14 COMBAT [0/35/0/0|15]
L&K14 COMBAT [0/0/0/0|25]
Launcher +8 [0/0/0/20|50] [Charge]
Arms [0/50/50/0|30] [Spirit]
Arms +2 [0/0/0/40|40] [Chaos]
FINAL IMPACT [0/35/25/0|0]
LOLLIPOP [0/0/0/0|0]
Scepter +3 [50/0/0/0|50] [Ice]
Scepter +3 [50/0/0/0|50] [Ice]
Scepter +3 [50/0/0/0|50] [Ice]
SILENCE CLAW [0/0/45/0|50]
SILENCE CLAW [0/40/0/0|20]
STAG CUTLERY [0/20/0/0|0]
TWIN BRAND [20/0/15/0|0]
TWIN BRAND [0/0/0/0|0]
ANGRY FIST [0/0/25/0|0]
SONIC KNUCKLE [0/0/0/0|0]
SONIC KNUCKLE [0/0/0/0|0]
AGITO (1975) [0/0/0/0|0]
LAVIS CANNON [25/0/25/0|0]
LAVIS CANNON [0/15/0/0|0]
LAVIS CANNON [0/0/35/0|0]
LAVIS CANNON [40/50/0/0|0]
VICTOR AXE [0/0/0/20|0]
CADUCEUS [0/0/20/0|0]
CADUCEUS [30/30/0/0|0]
CADUCEUS [20/0/0/0|0]
CADUCEUS [0/25/30/0|0]
ELYSION [20/0/25/0|0]
ELYSION [15/0/0/0|0]
ELYSION [5/0/0/35|0]
ELYSION [0/35/0/0|0]
HUGE BATTLE FAN [0/0/0/0|0]
WOK OF AKIKO'S SHOP [0/0/0/0|0]
RED DAGGER [0/25/25/0|0]
RED DAGGER [0/20/0/0|0]
FLIGHT CUTTER [0/0/0/0|0]
RED HANDGUN [0/0/0/20|0]
RED HANDGUN [15/0/0/0|0]
RED HANDGUN [20/15/0/0|0]
RED HANDGUN [30/15/0/0|0]
RED HANDGUN [0/0/0/0|0]
RED HANDGUN [0/25/0/0|0]
RED HANDGUN [0/0/30/0|0]
RED HANDGUN [10/0/0/0|0]
RED HANDGUN [20/0/0/0|0]
RED HANDGUN [30/15/0/10|0]
RED HANDGUN [0/15/0/0|0]
RED HANDGUN [0/0/25/0|0]
RED HANDGUN [30/0/30/0|0]
FROZEN SHOOTER [25/0/30/0|0]
FROZEN SHOOTER [0/0/10/20|0]
FROZEN SHOOTER [20/0/0/25|0]
FROZEN SHOOTER [15/0/0/0|30]
FROZEN SHOOTER [0/20/0/0|0]
FROZEN SHOOTER [10/20/0/0|0]
FROZEN SHOOTER [20/25/0/0|0]
FROZEN SHOOTER [10/10/0/0|0]
FROZEN SHOOTER [30/20/0/15|0]
FROZEN SHOOTER [0/25/0/0|0]
FROZEN SHOOTER [20/5/10/0|0]
FROZEN SHOOTER [0/15/10/0|0]
FROZEN SHOOTER [0/15/0/0|0]
FROZEN SHOOTER [0/20/15/0|0]
FROZEN SHOOTER [25/30/0/0|0]
FROZEN SHOOTER [0/0/0/0|0]
FROZEN SHOOTER [30/0/20/0|0]
FROZEN SHOOTER [0/0/0/5|0]
FROZEN SHOOTER [0/0/0/30|0]
FROZEN SHOOTER [0/0/0/0|0]
FROZEN SHOOTER [20/0/0/0|0]
FROZEN SHOOTER [20/0/30/0|0]
WINDMILL [10/25/0/0|0]
WINDMILL [20/0/0/15|0]
RABBIT WAND [0/0/0/0|0]
PLANTAIN LEAF [40/45/50/0|0]
BRANCH OF PAKUPAKU [0/15/0/0|0]
BRANCH OF PAKUPAKU [0/30/0/0|0]
BRANCH OF PAKUPAKU [0/0/20/0|0]
BRANCH OF PAKUPAKU [0/0/0/0|0]
BRANCH OF PAKUPAKU [0/25/0/0|0]
BRANCH OF PAKUPAKU [0/15/0/0|0]
BRANCH OF PAKUPAKU [0/0/0/0|0]
BRANCH OF PAKUPAKU [20/0/25/0|0]
BRANCH OF PAKUPAKU [10/0/0/0|0]
YAMATO [25/0/0/0|0]
PHOTON LAUNCHER [0/0/0/30|0]
GUILTY LIGHT [0/10/0/0|0]
GUILTY LIGHT [0/25/0/0|15]
GUILTY LIGHT [20/25/0/0|0]
GUILTY LIGHT [0/25/10/0|0]
RED SCORPIO [10/0/15/0|0]
RED SCORPIO [0/0/0/25|40]
RED SCORPIO [0/20/0/0|0]
RED SCORPIO [30/0/0/0|25]
RED SCORPIO [0/35/30/0|0]
RED SCORPIO [0/25/0/0|25]
RED SCORPIO [10/0/10/0|30]
RED SCORPIO [0/25/0/40|30]
RED SCORPIO [0/30/20/0|25]
MAHU [0/0/0/30|0]
DEMOLITION COMET [0/0/20/0|0]
DEMOLITION COMET [0/0/0/25|0]
DEMOLITION COMET [0/20/0/0|0]
DEMOLITION COMET [0/10/15/0|0]
DEMOLITION COMET [0/0/15/0|0]
DEMOLITION COMET [0/0/25/0|0]
DEMOLITION COMET [35/40/0/0|0]
DEMOLITION COMET [0/35/25/0|0]
DEMOLITION COMET [0/0/15/0|0]
DEMOLITION COMET [0/20/0/30|0]
DEMOLITION COMET [0/0/40/45|0]
DEMOLITION COMET [0/40/40/30|0]
DEMOLITION COMET [0/15/25/0|0]
DEMOLITION COMET [0/30/15/0|0]
AMORE ROSE [0/0/0/0|0]
OPHELIE SEIZE [0/15/0/0|0]
FLAMBERGE [0/0/0/55|0]
FLAMBERGE [35/0/0/0|0]
DAYLIGHT SCAR [25/25/0/0|0]
DAYLIGHT SCAR [15/0/0/0|0]
Armors/Shields/Units/Techs/Materials/OtherSPIRIT GARMENT [DEF: 0/EVP: 0] [Slots: 2]
SPIRIT GARMENT [DEF: 0/EVP: 0] [Slots: 0]
SPIRIT GARMENT [DEF: 0/EVP: 3] [Slots: 1]
SACRED CLOTH [DEF: 0/EVP: 0] [Slots: 2]
SACRED CLOTH [DEF: 0/EVP: 0] [Slots: 2]
TEMPEST CLOAK [DEF: 2/EVP: 5] [Slots: 1]
TEMPEST CLOAK [DEF: 0/EVP: 0] [Slots: 1]
SELECT CLOAK [DEF: 0/EVP: 0] [Slots: 0]
GODRIC'S CLOAK [DEF: 6/EVP: 0] [Slots: 2]
GODRIC'S CLOAK [DEF: 1/EVP: 0] [Slots: 1]
REGENERATE GEAR [DEF: 0/EVP: 0]
REGENERATE GEAR [DEF: 0/EVP: 0]
REGENERATE GEAR [DEF: 0/EVP: 0]
REGENERATE GEAR [DEF: 7/EVP: 6]
REGENERATE GEAR [DEF: 3/EVP: 7]
REGENERATE GEAR [DEF: 0/EVP: 0]
REGENERATE GEAR [DEF: 0/EVP: 0]
God/Power
God/Power
God/Power
God/Power
God/Mind
God/Mind
God/Mind
God/Mind
God/Mind
God/Mind
God/Mind
God/Mind
God/Mind
God/Mind
God/Mind
God/Mind
God/Mind
God/Mind
God/Mind
God/Mind
God/Mind
God/Mind
God/Mind
God/Mind
God/Mind
God/Mind
God/Mind
God/Mind
God/Mind
God/Arm
God/Body
God/Body
God/Body
God/Body
God/Body
God/Body
God/Body
God/Body
God/Body
God/Body
God/Body
God/Body
God/Body
God/Body
God/Body
God/Body
God/Body
God/Body
God/Body
God/Body
God/Body
God/Body
God/Body
God/Ability
HP/Revival
HP/Revival
HP/Revival
HP/Revival
HP/Revival
Devil/Technique
Devil/Technique
Devil/Technique
Devil/Technique
Devil/Technique
Devil/Technique
Devil/Technique
Devil/Technique
Devil/Technique
Devil/Technique
Devil/Technique
Devil/Technique
Cure/Shock
Cure/Shock
Cure/Shock
Cure/Shock
Cure/Shock
Cure/Shock
Cure/Shock
Cure/Shock
Cure/Shock
Cure/Shock
Cure/Shock
Cure/Shock
Cure/Shock
Cure/Shock
Cure/Shock
Cure/Shock
Cure/Shock
Cure/Shock
Cure/Shock
Cure/Shock
Cure/Shock
Cure/Shock
Cure/Shock
Cure/Shock
YASAKANI MAGATAMA
YASAKANI MAGATAMA
V801
V801
V801
Heavenly/Mind
Heavenly/Mind
Heavenly/Arms
Heavenly/Arms
Heavenly/Arms
Heavenly/Arms
Heavenly/Arms
Heavenly/Technique
Heavenly/Technique
Centurion/Luck
Centurion/Luck
Centurion/Luck
Centurion/Luck
Centurion/Luck
Centurion/Luck
Centurion/Luck
Centurion/Luck
Mag [Purple] [5/0/0/0] [Empty | Empty | Empty]
Reverser Lv: 1
Anti Lv: 5
Anti Lv: 5
Anti Lv: 6
Jellen Lv: 15
Rafoie Lv: 15
Deband Lv: 15
Zalure Lv: 15
Jellen Lv: 15
Gizonde Lv: 15
Rabarta Lv: 15
Zonde Lv: 15
Jellen Lv: 15
Gizonde Lv: 20
Gifoie Lv: 20
Barta Lv: 20
Gifoie Lv: 20
Resta Lv: 20
Jellen Lv: 20
Barta Lv: 20
Rafoie Lv: 20
Gifoie Lv: 20
Foie Lv: 20
Rafoie Lv: 20
Barta Lv: 20
Gifoie Lv: 20
Gifoie Lv: 20
Zonde Lv: 20
Jellen Lv: 20
Jellen Lv: 20
Razonde Lv: 20
Foie Lv: 20
Rabarta Lv: 20
Gifoie Lv: 22
Rafoie Lv: 22
Gifoie Lv: 22
Barta Lv: 26
Foie Lv: 27
Foie Lv: 27
Rabarta Lv: 28
Resta Lv: 28
Zonde Lv: 28
Gifoie Lv: 28
Barta Lv: 28
Barta Lv: 29
Rafoie Lv: 29
Resta Lv: 29
Resta Lv: 29
Foie Lv: 29
Zalure Lv: 30
Mind Material x30
Evade Material x86
Def Material x85 -
Heya, I'll grab that spread needle off you; if you want?
Thanks! -
47 minutes ago, Frethia Runo said:
to make one that saves like that you need to save it in a way that it keeps the alpha in the dds file for import. if you want we can talk of this in pm and I can likely get you the textures you need made with the alphas
Thanks! Sent PM
-
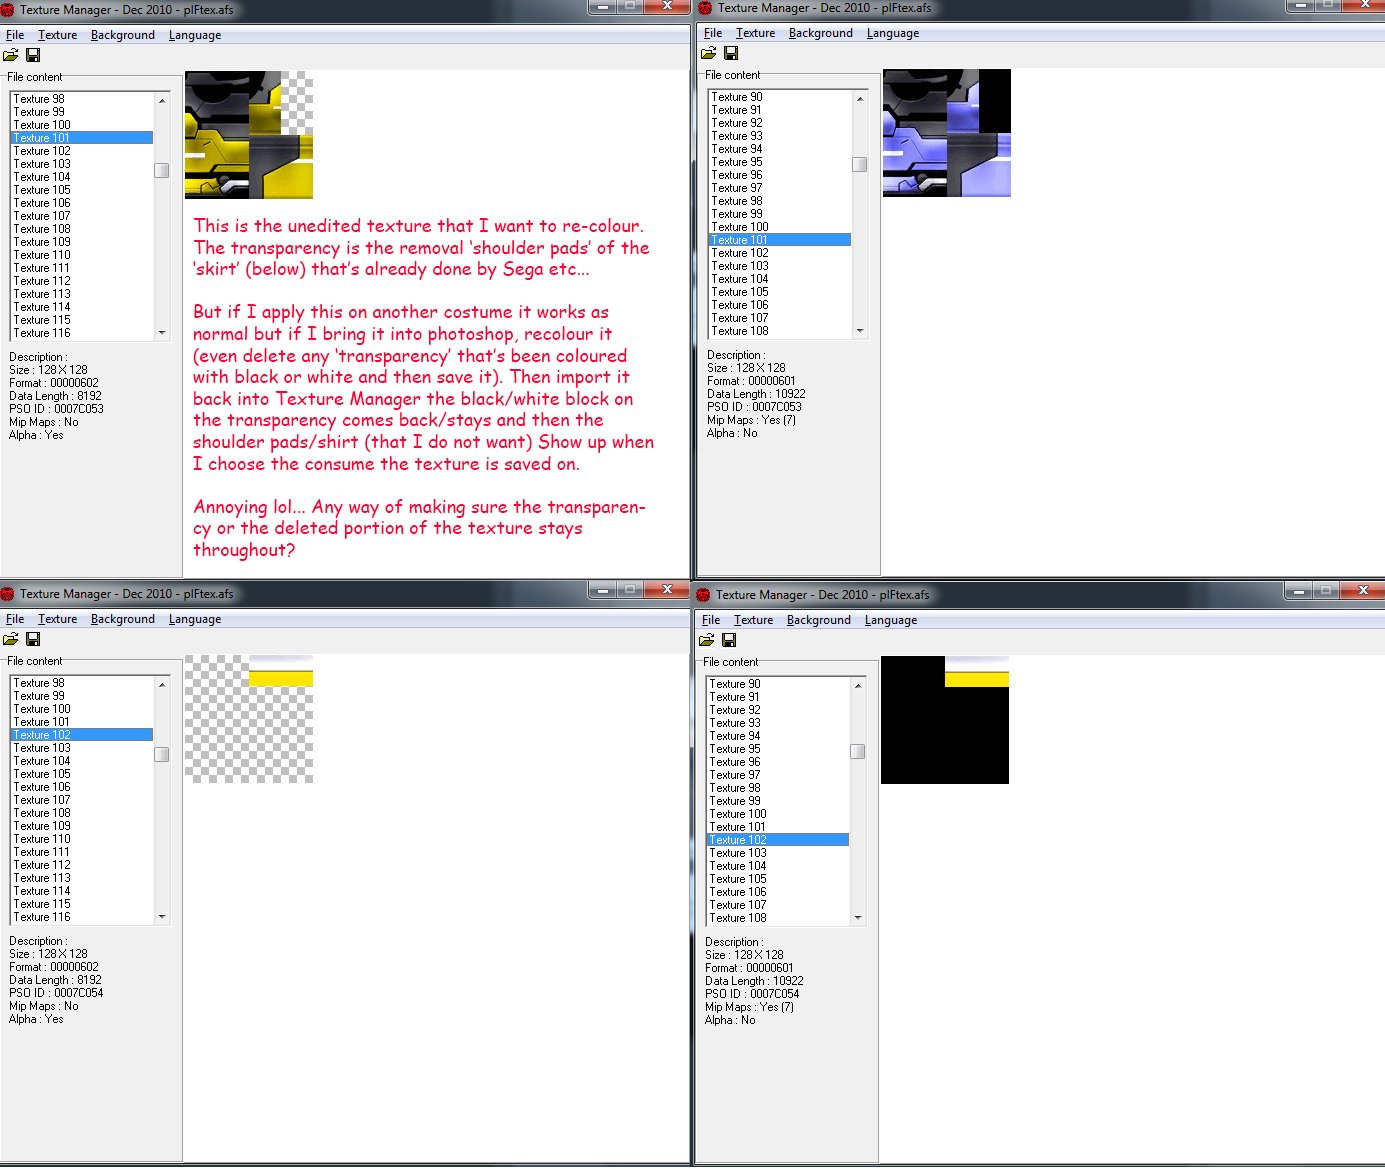
I'm trying to get this skin to work for my RAcaseal.
When you pick the 'yellow suit '3/7', the one devoid of shoulder pads and skirt. if I use those same skins on another costume they will carry over that texture on that consume without the shoulder pads and skirt (which is what I want but I want to also change the colour). But when I upload the texture into photoshop the 'transparency' is lost and has a black/white fill instead. When I delete it to reveal the transparency, in-which I believe allows the removal of that part of the texture being expressed on your character; it comes back with white/black when I import it on Texture Manger and the character will have those parts but it'll be straight black and white.
Thanks!
-
There has been threads on other PSO based forums in the past that have a: "Level 200 character thread", and "S-rank thread" (which I was OP on the old Scthacks forusm) etc... So if you hit level 200 for example, you can just posts your character data down via the thread in the following manner below:
[FORUM NAME] - [CHARACTER NAME] - [CLASS] - [ID] - [LEVEL]
[FORUM NAME] - [CHARACTER] - [CLASS] - [S-RANK NAME/S-RANK]
I personally find its a good way to know who's 200 on the server, what S-ranks have been achieved and to overt the data for people to look at it. Could there be a little prize for reaching Lv 200 too? What do you guys think? :3


---
in Trade Center
Posted
2PD's for your Amp of Red? <3